

Dojo is an Open Source DHTML toolkit written in JavaScript. It builds on several contributed code bases (nWidgets, Burstlib, f(m)), which is why it is referred as a "unified" toolkit. Dojo aims to solve some long-standing historical problems with DHTML which prevented mass adoption of dynamic web application development (*).
(*)Source: dojotoolkit.org.
In addition to providing a JavaScript standard library of sorts, Dojo also packs a collection of feature-rich, turnkey widgets that require little to no JavaScript coding at all, build tools, a testing framework, and more.
Dojo is divided into two parts: Dojo Base, and Dojo Core. Dojo Base is the functionality provided for
by just including dojo.js, and Dojo Core is comprised of stable additional (optional) components.
The purpose of this tutorial as all other tutorials is never-changing which consist to provide a starting point for dojo “newcomers”. No need to complicate things, just take it easy now.
The main parts are:
1 - Covering the requirements
Remark : Normally the following examples are validated to be run on IE 6/7, Firefox and Safari (did not tested by JCargoo).
2 - Setting up Dojo and Easy sample with Button Widget
Just unzip Dojo you got from the link above into the root of your Web Project in the Web Server.
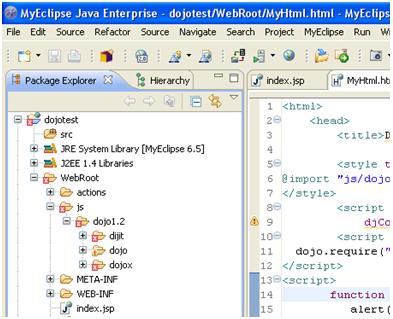
Now we will have a look at the following HTML file:

May be it is for you now a pretty simple stuff. But how the script works?
3 - Reading Data from the Server using JSP
The script will be modified somewhat. First we will add these two functions into the head element:

4 - Nice example: dojox.widget.Rating (since V1.2)
The power of the new version of Dojo has no limits. You will see in the next example how Dojo makes life easy for rating scripts. You don’t need to waste time on coding tortuous JavaScript scripts. Just have look here:
Put this part code into the header:
And put this one into the body element:

- numStars is the number of starts to be displayed and value sets the initially selected number of stars
Now let’s have an additional feature for the above script. Since you select a star, the script displays the star’s position as well as the current position of the mouse when it is over a star.
To sum up, this example shows what events you can connect to and how to do this using inline script blocks.
Keep all things like they are and just modify as indicated in the following:
From:
A small overview like this one can help you to start programming Dojo. Don’t forget to refer to more details in the dojotoolkit site.
The purpose of this tutorial as all other tutorials is never-changing which consist to provide a starting point for dojo “newcomers”. No need to complicate things, just take it easy now.
The main parts are:
- Covering the requirements
- Setting up Dojo and Easy sample with Button Widget
- Reading Data from the Server using JSP
- Nice example: dojox.widget.Rating (Added since V1.2)
1 - Covering the requirements
Remark : Normally the following examples are validated to be run on IE 6/7, Firefox and Safari (did not tested by JCargoo).
2 - Setting up Dojo and Easy sample with Button Widget
Just unzip Dojo you got from the link above into the root of your Web Project in the Web Server.
Now we will have a look at the following HTML file:
<html>
<head>
<title>Hello World! from Dojo</title>
<script type="text/javascript" src="pathtodojo/dojo/dojo.js"
djConfig="parseOnLoad: true"></script>
<script type="text/javascript">
// Load Dojo's code relating to the Button widget
dojo.require("dijit.form.Button");
</script>
</head>
<body>
<button dojoType="dijit.form.Button" id="helloButton">
Hello World!
<script type="dojo/method" event="onClick">
alert('You pressed the button');
</script>
</button>
</body>
</html>
May be it is for you now a pretty simple stuff. But how the script works?
- The script element inserted into the head section with src parameter value dojo.js is responsible for loading the base Dojo script that provides access to all the other Dojo functionality that we will use after;
- The dojo.require line instructs Dojo to load the Button widget. This requirement is mandatory in order to get the expected feature from the button Widget;
- In the body section of the HTML I have created a button element with a key attribute dojoType="dijit.form.Button". The dojoType attribute is responsible for instructing Dojo on how to process the element when the page is loading;
- In order to attach an event to a button, we should do it through a script tag. The type of the script tag is: dojo/method. According to the event value, the execution of the script will start as soon as the button is clicked.
3 - Reading Data from the Server using JSP
The script will be modified somewhat. First we will add these two functions into the head element:
<script>
function helloCallback(data,ioArgs) {
alert(data);
}
function helloError(data, ioArgs) {
alert('Error occurred when retrieving data from the server!');
}
</script>
- We normally need a callback function to handle the data to be returned from the server;
- The two arguments of the functions (data, and ioArgs) are important. The first one (data) contains the data sent back from the server and the second argument contains a Dojo I/O Bind object. Those two functions will be used in the DATA sending using GET.
<button dojoType="dijit.form.Button" id="helloButton">To this one:
Hello World!
<script type="dojo/method" event="onClick">
alert('You pressed the button');
</script>
</button>
<button dojoType="dijit.form.Button" id="helloButton">
Hello World!
<script type="dojo/method" event="onClick">
dojo.xhrGet({
url: 'HelloWorldGET.jsp',
load: helloCallback,
error: helloError,
content: {name: dojo.byId('name').value }
});
</script>
</button>
Please enter your name: <input type="text" id="name">
- dojo.xhrGet function is set to use JSP file HelloWorldGET.jsp (of course you can choose any kind of server: PERL, PHP…);
- The property - content - allows the programmer to send any values to the server as parameters. In this case, since we are using GET, the server side script will have the value of the textbox available to it as a the GET parameter 'name'.
Hello <%= request.getParameter("name") %> , welcome to Dojo in JCargoo Community!
4 - Nice example: dojox.widget.Rating (since V1.2)
The power of the new version of Dojo has no limits. You will see in the next example how Dojo makes life easy for rating scripts. You don’t need to waste time on coding tortuous JavaScript scripts. Just have look here:
Put this part code into the header:
<style type="text/css">
@import "pathtodojo/dojo/dojox/form/resources/Rating.css";
</style>
<script type="text/javascript">
dojo.require("dojox.form.Rating");
</script>
And put this one into the body element:
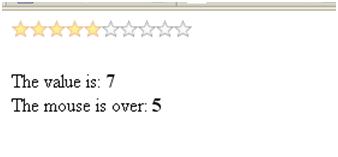
<div dojoType="dojox.form.Rating" numStars="10" value="2"></div>
- numStars is the number of starts to be displayed and value sets the initially selected number of stars
Now let’s have an additional feature for the above script. Since you select a star, the script displays the star’s position as well as the current position of the mouse when it is over a star.
To sum up, this example shows what events you can connect to and how to do this using inline script blocks.
Keep all things like they are and just modify as indicated in the following:
From:
<div dojoType="dojox.form.Rating" numStars="10" value="2"></div>To:
<p id="inlineEvents">
<span dojoType="dojox.form.Rating" numStars="10">
<script type="dojo/event" event="onChange">
dojo.query('#inlineEvents .value')[0].innerHTML = this.value;
</script>
<script type="dojo/event" event="onMouseOver" args="evt,value">
dojo.query('#inlineEvents .hoverValue')[0].innerHTML = value;
</script>
</span>
<br /><br />
The value is: <b><span class="value">0</span></b><br />
The mouse is over: <b><span class="hoverValue">0</span></b>
</p>
A small overview like this one can help you to start programming Dojo. Don’t forget to refer to more details in the dojotoolkit site.
 How to encourage this blog if you like it:
- Promote our sponsors;
- Add any kind of comment or critic;
- Ask me directly by email if you prefer.


 I am
I am