
 At some point you may need to have a submit news application in your website. I will not talk about the advantage of creating of such functionality. However, the purpose of this tutorial is to show you how you can create a smart submit news feature.
If you wish have a complete submit news application with all the features you need inside (captcha, more security, send email confirmation, tooltips, flag moderation for admin…), please get in touch with me and I will help you to perform that.
Scenario
You have a form you have to fill out. Every element has a special condition to be verified before being inserted in the database.
As soon as all defined conditions are validated, all information will be stored in a dedicated SQL. The stored segment table will contain then all the required article elements. All this will be performed thanks to AJAX.
Here's the sequence of events that will take place here:
- The page shows the HTML form;
- User fills out properly every form field and submits his article information;
- An AJAX request will fire;
- The filled data will be first validated and after stored in the database;
- Once the insert step has been successfully done, a confirmation message will be displayed to the user;
- All these steps will be done in a slick display;
- Even when JavaScript is disabled, the article submission should work normally (but without animation effects).
Getting Started
We are going to need the jQuery library, jQuery Color plugin. We will also be using some CSS, PHP and a MySQL database to store our data.
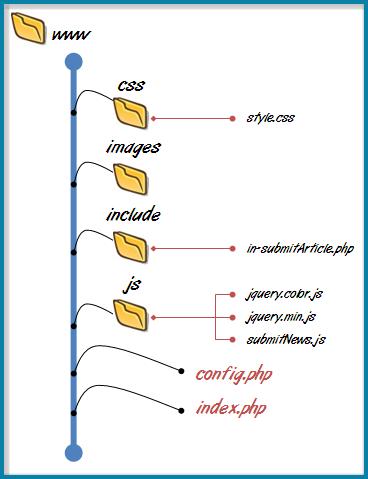
Here a detailed structure of the web application we are going to build:
HTML and CSS
The structure of the form will be as follows:
<div id="container">
  <form id="form" action="index.php" method="post">
    <div class="info">Submit your Article here</div>
    <p>
      <label for="name">Name</label>
      <input type="text" name="name" id="name" />
    </p>
    <p>
      <label for="email">Email</label>
      <input type="text" name="email" id="email"/>
    </p>
    <p>
      <label for="url">Post URL</label>
      <input type="text" name="url" id="url" value="http://"/>
    </p>
    <p>
      <label for="description">Description</label>
      <textarea name="description" id="description" ></textarea>
    </p>
    <input name="submit" type="submit" id="submit" class="submit" value="Submit">
  </form>
</div>
For the CSS, I believe that it will be pointless to show the whole CSS. So let’s talk about the most important CSS classes:
#form .error {
    text-align:center;
    border:solid 1px #CC0000;
    background:#F7CBCA url(../images/error.png) 3px 2px no-repeat;
    color:#CC0000;
    font-weight:bold;
    padding:4px;
    margin:10px;
    -moz-border-radius: 5px;
    -webkit-border-radius: 5px;
}
#container .result {
    text-align:center;
    -moz-border-radius: 5px;
    -webkit-border-radius: 5px;
    border:solid 1px #90ac13;
    background:#eef4d3 url(../images/ok.png) 3px 3px no-repeat;
    color:#6b800d;
    font-weight:bold;
    padding:4px;
    margin:10px;
}
.overlay {
    position: absolute;
    -moz-border-radius: 3px;
    -webkit-border-radius: 3px;
    width: 100%;
    height: 100%;
    background: #888888 url(../images/ajax-loader.gif) no-repeat 50% 50%;
    left: 0;
    top: 0;
    display: none;
    opacity: .9;
}
- “error” class is supposed to be shown when the form fields are not correctly set;
- “result" class will be used when we will confirm to the user that his article is under moderation (stored in the database);
- “overlay” class will be activated when the AJAX call will be fired. This class will be applied in the form area with a loading progress image;
- The whole CSS code is easy to assimilate. All is about to make beautiful our form layout.
First, we have to call our JavaScript library and plugin to use as well as submitNews.js, a custom build which includes our JavaScript code.
<script src="./js/jquery.min.js" type="text/javascript"></script>
<script src="./js/jquery.color.js" type="text/javascript"></script>
<script src="./js/submitNews.js" type="text/javascript"></script>
The first code snippet is merely used to make a kind of special input and textarea elements by changing their background color when they receive focus/blur.
“:input” is used to match all input and textarea.
$(':input').focus(function() {
    $(this).css('background-color', '#EFF5FF');
});
$(':input').blur(function() {
    $(this).css('background-color', '#fff');
});
Now let’s have a look at the core of our AJAX. I will past the code here and after relate a couple of things step by step:
 $('#submit').click(function(){


  var name = $('#name').val().replace(/[^\d\w ]+/ig,'');
  var email = $('#email').val().match(/^([a-zA-Z0-9_\-\.]+)@[a-z0-9-]+(\.[a-z0-9-]+)*(\.[a-z]{2,3})$/i) ? $('#email').val() : null;
  var url = $('#url').val().match(/^(https?:\/\/)?([\da-z\.-]+)\.([a-z\.]{2,6})([\/\w \.-]*)*\/?$/) ? $('#url').val() : null;
  var description = $('#description').val();

   if (name.length <4  email == null  url == null  description.length < 4){
    if ($('.error').length == 0){
     $('form .info').fadeOut(200).attr("class", "error").hide().html('Please fill out each field correctly!').fadeIn(1000);
    }
    else{
    $('.error').stop().animate({
      backgroundColor : "#CC0000"
     }, {
      duration : 200,
      complete : function() {
       $(this).animate( {
        backgroundColor : "#F7CBCA"
       }, 600);
      }
     });
    }

     return false;
   }

  $.post(
       './include/in-submitArticle.php', {
     'name' : name,
     'email': email,
     'url': url,
     'description': description
       },

       function(r){
        $('.error').fadeOut(200);
        $('<div class="overlay"></div>')
        .appendTo('#form')
        .fadeIn(1000, function(){
         $('#form')
         .slideUp(800,function(){
          $('#container').append('<div class="result">'+r+'</div>')
                .hide()
                .fadeIn(1000);
         });

      });


    }

    );

 return false;// disable submit click

 });
- Once the submit button is clicked, we first pick up values filled out by user and perform some checks using regular expression method (here some details about the regular expressions used in this code: here and here);
- We set up some conditions to check if every filled field’s value is valid or not;
- If the defined conditions are not respected, we apply the “error” class instead of the “info” class;
- And if the “error” class is already existing, we just animate its background to draw the attention of the user;
“post” function will load a remote page using an HTTP POST request.
- The URL specified points to in-submitArticle.php;
- in-submitArticle.php is the PHP script responsible of storing the filled article information in the database;
- This PHP script will run on the server side with key/value sent to this server. This means that the PHP script will use these parameter values in order to be executed. I will make more comprehensible the role of this script in the right section below;
- Before the data will be loaded successfully from the server (from in-submitArticle.php), the bundled function defined inside the post function will apply the “overlay” class (loading image inside the form section) before showing the result of article insertion with an animated show.
This is all what I can say about the main JavaScript code.
SQL
We create a database named ‘ajaxnews' and a table inside which contains all fields we need to store:
Database: ' ajaxnews'
CREATE TABLE IF NOT EXISTS `articles` (
  `id` int(11) NOT NULL AUTO_INCREMENT,
  `name` varchar(200) NOT NULL,
  `email` varchar(200) NOT NULL,
  `url` varchar(400) DEFAULT NULL,
  `description` varchar(1000) DEFAULT NULL,
  PRIMARY KEY (`id`)
) ENGINE=MyISAM  DEFAULT CHARSET=latin1;
PHP
Let’s get to data handling posted thanks to jQuery. I will start with config.php.
This file contains the connection settings that you should customize for your own parameters:
<?php

    $server  = 'localhost';
    $username='root';
    $password='';
    $db = 'ajaxnews';

    define('IS_AJAX', isset($_SERVER['HTTP_X_REQUESTED_WITH']));
?>
IS_AJAX constant will help to know if AJAX request is taking place or not. This is the need to use “isset” function.
in-submitArticle.php
<?php

require 'c:\wamp\www\loginForm\config.php';

if(IS_AJAX) {
 $post['name'] = trim($_POST['name']);
 $post['email'] = trim($_POST['email']);
 $post['url'] = trim($_POST['url']);
 $post['description'] = trim($_POST['description']);
}

$mysqli = new mysqli($server, $username, $password, $db) or die('There is a problem in the connection [mysqli]');

$stmt = $mysqli->stmt_init();

if($stmt = $mysqli->prepare("INSERT INTO articles VALUES (NULL,?,?,?,?)")){

  $stmt->bind_param('ssss', $post['name'], $post['email'], $post['url'], $post['description']);

  if(!$stmt->execute()) die($mysqli->error);

  $stmt->close();

  $mysqli->close();


  echo "Hey " .$post['name']. ", Thanks for Submitting!";


 }

 else{
  echo "Problem occurred at insert step!";
  }
?>
- First, we require the config.php file because we will use all the variables we defined inside;
- After that, we will check if AJAX is activated. If yes, the array “post” will contain all the trimmed values of the HTML form;
- The rest is pretty simple to follow as it is regarding the standard method of connection to a database as well as the insertion using SQL language;
If you remember, the HTML form action points to index.php. The index.php script is in the following snippet:
<?php
if(isset($_POST['submit'])){
 $post = array();
 $error = false;
 foreach($_POST as $key=>$value){
  if(isset($_POST[$key]) && strlen(trim($_POST[$key]))>=4){
   $post[$key] = trim($value);
  }
  else $error = true;

  if ($key === 'email'){
   if(!filter_var($value, FILTER_VALIDATE_EMAIL)) $error =true;
  }

  if ($key ==='url'){
   if(!filter_var($value, FILTER_VALIDATE_URL)) $error =true;
  }

  }

  if(!$error){
   require './include/in-submitArticle.php';
  }
  else{
   echo "Please fill out correctly the fields!";
  }
 }
?>
Here too we check if the submit button has been clicked. We also execute some verification regarding the length of the filled values and the validation of the email address and the URL using filers: FILTER_VALIDATE_EMAIL and FILTER_VALIDATE_URL.
I cannot guarantee that the filters will do the same work as the regular expressions we set up in the JavaScript code. FILTER_VALIDATE_EMAIL knows some bugs but you can use it with no worries as I continue to use it with no kind of problems.
Of course there are other ways to achieve this functionality, but keep in mind that the purpose of this tutorial is to talk easily about AJAX and PHP.
This application has been tested successfully in all famous browsers.
Thanks for reading and please feel free to ask.
Tools used to develop this application
- Adobe Dreamweaver CS4 for design; You can simply use Notepad++ to edit perfectly your code for free;
- WampServer to run Apache, MySQL and PHP in Windows.
Read also:
 How to encourage this blog if you like it:
- Promote our sponsors;
- Add any kind of comment or critic;
- Ask me directly by email if you prefer.


 I am
I am