Showing posts with label Java/J2EE. Show all posts

Edit the default JSP home page of Tomcat

Posted by jcargoo | Monday, November 10, 2008
| 0Delicious Twitter Reddit Digg Loading...

All the default Tomcat home page components come from the ROOT webapp servlet called org.apache.jsp.index_jsp. This page is simply $CATALINA_HOME/webapps/ROOT/index.jsp which has been precompiled into a class file (org.apache.jsp.index_jsp.class) stored in a JAR file (catalina-root.jar) in the ROOT webapp's WEB-INF/lib directory.
Then the easiest way to change the contents of the index.jsp page is to remove

the index_jsp servlet from the ROOT webapp. Once you remove the index_jsp servlet and restart Tomcat, Tomcat will see the index.jsp file in the ROOT directory and compile it on the fly into a class file. You now will be able to edit the ROOT/index.jsp file and have those changes take effect immediately by reloading the http://localhost:8080/ page.
But in order to remove correctly the index_jsp servlet, you can edit the ROOT web application's configuration file, $CATALINA_HOME/webapps/ROOT/WEB-INF/web.xml. Comment out the definition of the servlet and the servlet mapping, so that section of the file will look like the following:
<!-- JSPC servlet mappings start -->

<!-- Commenting out so I can change the index.jsp page
<servlet>
<servlet-name>org.apache.jsp.index_jsp</servlet-name>
<servlet-class>org.apache.jsp.index_jsp</servlet-class>
</servlet>

<servlet-mapping>
<servlet-name>org.apache.jsp.index_jsp</servlet-name>
<url-pattern>/index.jsp</url-pattern>
</servlet-mapping>
-->
<!-- JSPC servlet mappings end -->
Once you disable the index_jsp servlet and restart Tomcat, how does Tomcat know to compile the index.jsp page in the ROOT web app's directory?
First, when you request the default page of a web application, Tomcat will look for a welcome file. The default welcome files are defined at the bottom of $CATALINA_HOME/conf/web.xml. This web.xml file acts as a global web.xml file used for all web applications installed in Tomcat. The default welcome file list includes index.jsp, which means Tomcat will try to load that file if found in order to display it.
Second, the $CATALINA_HOME/conf/web.xml configuration file also defines a servlet called simply jsp. This section of the web.xml file:
<!-- The mapping for the JSP servlet -->
<servlet-mapping>
<servlet-name>jsp</servlet-name>
<url-pattern>*.jsp</url-pattern>
</servlet-mapping>

<servlet-mapping>
<servlet-name>jsp</servlet-name>
<url-pattern>*.jspx</url-pattern>
</servlet-mapping>
maps all .jsp and .jspx pages to the jsp servlet. The jsp servlet performs the work of compiling the source JSP file into a servlet and then executing the servlet. The JSP servlet, by default, will check the JSP source page every time it is requested to see if it was modified since the last time it was compiled. If the page changed within 4 seconds of the last time it was compiled, the servlet will recompile the source JSP page before running it. The behavior of the jsp servlet is quite configurable. You can see all its options defined in the $CATALINA_HOME/conf/web.xml configuration file.

Read More


MySQL Connection Timeout and Hibernate

Posted by jcargoo | Monday, November 3, 2008
| 0Delicious Twitter Reddit Digg Loading...

Several months ago, I was trying to click on a feature link of my personal web application using my MySQL database after I have left the connection to database from awhile and suddenly the following error was displayed in my screen:

SEVERE: Servlet.service() for servlet default threw exception
java.sql.BatchUpdateException: Lock wait timeout exceeded; try restarting transaction
at com.mysql.jdbc.PreparedStatement.executeBatchSerially(PreparedStatement.java:1666)
at com.mysql.jdbc.PreparedStatement.executeBatch(PreparedStatement.java:1082)

The issue had to do with the connection time out in MySQL, and the default
C3P0 setup that Hibernate uses. I have not been able to find the solution gathered together in one place, this why I am talking about it here.

Problem:
Technically speaking, after my Struts2/Hibernate/MySQL solution has been running but inactive for more than 8 hours, I get a broken pipe exception.

Cause:
MySQL automatically times out and closes unused connections after 8 hours (what is defined in the administration configuration). In addition to this, I did not have my Hibernate C3P0 to appropriately test and refresh the connection pool when connections are stale.

Solution:
Here is a snippet from the hibernate.cfg.xml which you add in order to fix the issue:

</html>
<session-configuration>
<!—Start C3P0 Configuration -->
<property name="hibernate.c3p0.acquire_increment">3</property>
<property name="hibernate.c3p0.idle_test_period">14400</property>
<property name="hibernate.c3p0.timeout">25200</property>
<property name="hibernate.c3p0.max_size">15</property>
<property name="hibernate.c3p0.min_size">3</property>
<property name="hibernate.c3p0.max_statements">0</property>
<property name="hibernate.c3p0.preferredTestQuery">select 1;</property>
<!-- End C3P0 Configuration -->
</session-configuration>

For more details about the elements above please visit here.
The idle_test_period and timeout properties are very important. You want to make sure that C3P0 is configured to test for closed connections and time out unused connections at some rate beneath the sill you set on your MySQL server.

Now you can test:
To test you should just modify the connection timeout of the MySQL server and restart this latter (in Linux for example, you can put wait_timeout=60 in my.cnf file) and set a value beneath this one in the C3P0 configuration section.


Read More


Struts 2: Introducing the framework - Part 2: Autocompleter

Posted by jcargoo | Sunday, October 26, 2008
| 0Delicious Twitter Reddit Digg Loading...

Live demo: Not available from now on.

In this part you will find how struts2 fines down the autocompletion. This example is based on the ajax theme.
The ajax theme extends the xhtml theme with AJAX features. The theme uses the popular DOJO AJAX/JavaScript toolkit.
The aim of the current example is to help the user to select French region (total of 22 regions) he is looking for. Those regions will be suggested in a list. This list will use the autocomplete feature.
All things we need is to create an action which will add all regions before suggesting them as a list in a JSP page.
Our famous struts.xml is like this:


<!DOCTYPE struts PUBLIC
"-//Apache Software Foundation//DTD Struts Configuration 2.0//EN"
"http://struts.apache.org/dtds/struts-2.0.dtd">
<struts>
<package name="autocompletiontest" extends="struts-default">
<action name="autocompleter"
class="net.jcargoo.autocompleter">
<result name="SUCCESS">/pages/autocompleter.jsp</result>
</action>
</package>
</struts>

The web application is invoked directly by its name, and then we will need a welcome file as it is configured in following web server file configuration (web.xml):
<?xml version="1.0" encoding="UTF-8"?>
<web-app version="2.5" xmlns="http://java.sun.com/xml/ns/javaee"
xmlns:xsi="http://www.w3.org/2001/XMLSchema-instance"
xsi:schemaLocation="http://java.sun.com/xml/ns/javaee http://java.sun.com/xml/ns/javaee/web-app_2_5.xsd">
<filter>
<filter-name>struts2</filter-name>
<filter-class>
org.apache.struts2.dispatcher.FilterDispatcher
</filter-class>
</filter>
<filter-mapping>
<filter-name>struts2</filter-name>
<url-pattern>/*</url-pattern>
</filter-mapping>
<welcome-file-list>
<welcome-file>index.html</welcome-file>
</welcome-file-list>
</web-app>
Here is the index.html:

<!DOCTYPE html PUBLIC "-//W3C//DTD XHTML 1.0 Strict//EN" "http://www.w3.org/TR/xhtml1/DTD/xhtml1-strict.dtd">
<html xmlns="http://www.w3.org/1999/xhtml">
<head>
<title>E-Bouff</title>
<meta http-equiv="Content-Language" content="English" />
<meta http-equiv="Content-Type" content="text/html; charset=UTF-8" />
<meta http-equiv="Refresh"
content="0;URL=autocompleter.action" />
<link rel="stylesheet" type="text/css" href="./css/style.css"
media="screen" />

</head>
<body>
<div class="main">
<h1>
Struts 2 Autocompleter
</h1>
<h2>
Easy autocompletion
</h2>
For more info visit:
<a href="http://jcargoo.blogspot.com">http://jcargoo.blogspot.com</a>
<br />
<br />
<div class="box">
<p>
Please wait for the web application to start...
</p>
</div>
</div>
</body>
</html>
As you may notice, as soon as the welcome file is invoked, the user will be dispatched via the HTML element “meta http-equiv="Refresh"” to autocompleter action.
The code of the main action is:

package net.jcargoo;

/**
* @author JCargoo Community 2008
*
*/

import com.opensymphony.xwork2.ActionSupport;
import java.util.*;

public class autocompleter extends ActionSupport {
private List state;

public String execute() throws Exception {
state = new ArrayList();
state.add("Alsace");
state.add("Aquitaine");
state.add("Auvergne");
state.add("Basse Normandie");
state.add("Bourgogne");
state.add("Bretagne");
state.add("Centre");
state.add("Champagne - Ardenne");
state.add("Corse");
state.add("Franche Comté");
state.add("Haute Normandie");
state.add("Ile de France");
state.add("Languedoc Roussillon");
state.add("Limousin");
state.add("Lorraine");
state.add("Midi Pyrénées");
state.add("Nord - Pas de Calais");
state.add("Pays de la Loire");
state.add("Picardie");
state.add("Poitou - Charente");
state.add("Provence Alpes Cote d'azur");
state.add("Rhone Alpes");

return "SUCCESS";
}

public List getState() {
return state;
}
}


The action is using a List type field (state) to store all the French regions to be suggested in the final JSP page.
Since the result name is "SUCCESS" as per the file struts.xml, the action will forward us now to the main JSP file “autocompleter.jsp” to provide us the expected result. The code of the autocompleter.jsp is as follows:

<%@ taglib prefix="s" uri="/struts-tags"%>

<html>
<head>
<title>Struts 2 Autocompleter</title>
<s:head theme="ajax" />
<link href="<s:url value="/css/style.css"></s:url>" rel="stylesheet"
type="text/css">
</head>
<body>
<div class="main">
<h1>
Struts 2 Autocompleter
</h1>
<h2>
Easy autocompletion
</h2>
For more info visit:
<a href="http://jcargoo.blogspot.com">http://jcargoo.blogspot.com</a>
<br />
<br />
<div class="box">
<label>
<s:label name="stateName" value="Select Your French State Name" />
<s:autocompleter theme="simple" list="state" name="StateName" />
</label>
</div>
</div>
</body>
</html>
The element s:head represents a very important information as it indicates that we are using the ajax theme.

The autocomplete tag is a Combobox that can autocomplete text entered on the input box. When used on the "simple" theme, the autocompleter can be used like the ComboBox. When used on the "ajax" theme, the list can be retrieved from an action.

For UI files, we have chosen to style the representation with style.css which you can find in the zip source code.

Remark: To get the complete source code just click on here (used struts2 libs are enclosed).

Now if you have deployed the web application in Tomcat and used the port 8080, you just need to use this URL : http://localhost:8080/autocompletiontest. You can find the results in the video below:

In order to visualize the video with HD, just activate it!


Struts 2 Autocompleter from jcargoo on Vimeo

  • To enhance this example we can establish a Data Base connection in the “execute” in order to get the list values to show on the autosuggest list.
  • If you check the HTML source, you will find that the following element was added automatically by struts:
  • <select dojoType="struts:ComboBox" id="StateName" name="StateName" keyName="StateNameKey">

    This confirms that the used ajax theme is using DOJO.
    Read More


    Struts 2: Introducing the framework - Part 1

    Posted by jcargoo | Monday, October 20, 2008
    | 0Delicious Twitter Reddit Digg Loading...

    As I had already made the promise about the struts 2 annotations, I am pleased to present you in this post an example (I hope a clear one) regarding the utility of the annotations in struts.
    The sample is to classic and easy to understand.
    It consists of validating the login/password provided in a form against a hardcode values instead of a database (will be for another post).
    The functional details of the application are

    :
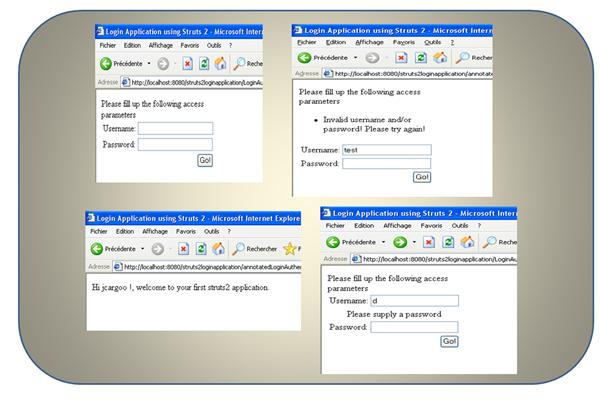
    • First Login page to invite the user to complete the login/password parameters and then clicks on the access button;
    • The validation of the submitted values is done in an action class. After this step, it is of course the role of this action to specify whichever of the pages (success/failure) sounds to be the correct one to be returned to the user. The hardcode value for login/password are : jcargoo/jcargoo;
    • Last step is an additional point which is the storing of the login value into the session. Since the application is classical, I wanted to add something which can be useful for other potential cases. Then, in the success page we can invoke the value of the stored session parameter (I mean the username).
    Remark: To develop our application, I am using Myeclipse, Struts2, JRE5, MyEclipse Tomcat 6 (or you can use this : tomcat)
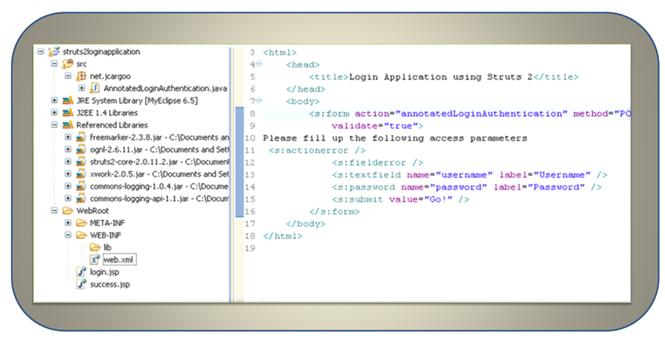
    The architecture of the application is like the following:


    1. We start by creating a new web project named “struts2loginapplication”.
    2. Normally following the link mentioned above, you can get the Full Distribution of struts2. Just unzip it.
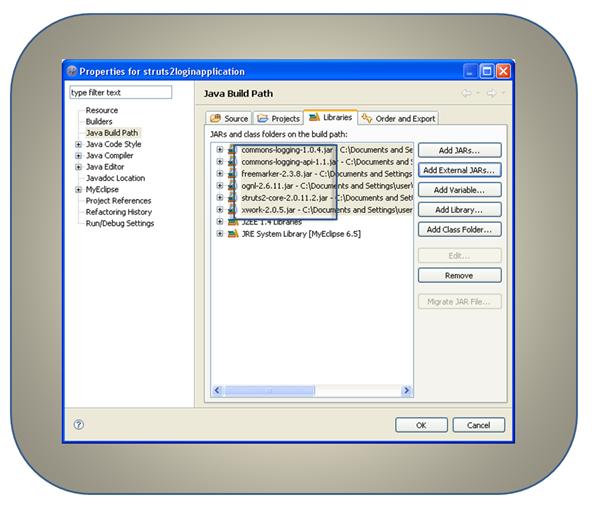
    3. Here are the “jar” files extracted from the unzipped full distribution of struts2 which you should select in the “add External JARS” under Properties/Java build Path/Libraries.


    Now we come back to the core of the application and will create the login page which has as name login.jsp and the code is:

    <%@ page language="java" contentType="text/html; charset=ISO-8859-1" pageEncoding="ISO-8859-1"%>
    <!DOCTYPE html PUBLIC "-//W3C//DTD HTML 4.01 Transitional//EN" "http://www.w3.org/TR/html4/loose.dtd">
    <%@ taglib prefix="s" uri="/struts-tags"%>
    <html>
    <head>
    <title>Login Application using Struts 2</title>
    </head>
    <body>
    <s:form action=" annotatedLoginAuthentication " method="POST"
    validate="true">
    Please fill up the following access parameters
    <s:actionerror />
    <s:fielderror />
    <s:textfield name="username" label="Username" />
    <s:password name="password" label="Password" />
    <s:submit value="Go!" />
    </s:form>
    </body>
    </html>

    This is simply the login success page to be displayed if the user has been correctly authenticated. The name of the page is success.jsp:

    <%@ page language="java" contentType="text/html; charset=ISO-8859-1" pageEncoding="ISO-8859-1"%>
    <!DOCTYPE html PUBLIC "-//W3C//DTD HTML 4.01 Transitional//EN" "http://www.w3.org/TR/html4/loose.dtd">
    <%@ taglib prefix="s" uri="/struts-tags"%>
    <html>
    <head>
    <title>Login Application using Struts 2</title>
    </head>
    <body>
    Hi <s:property value="#session.username" />!, welcome to your first struts2 application.
    </body>
    </html>
    Now let's develop the core of the application which is bluntly the main class to handle the login request. Its name will be AnnotatedLoginAuthentication and it will be packaged in the package name net.jcargoo.
    ActionSupport class is provided by Struts2 framework to be extended by our class. It is a convenient helper class. ActionSupport represents a convenience class that provides default implementations of the Action interface and several other useful interfaces, giving us such things as data validation and localization of error message.
    We have also imported the com.opensymphony.xwork2.validator.annotations package in order to use the annotations.

    The use of Java annotations plays an important role in this zero-configuration scheme. Please refer to the following link for further details: Annotations.

    Two annotations are needed in our application:

    1. Validation annotation: tells to Struts that the action in this class might need to be validated.
    2. RequiredStringValidator annotation: is used for the text input to hold a singular value.
    3. Result annotation: allows the definition of Action results in the Action class rather than an XML file.

    Here is the code of our action:

    package net.jcargoo;

    /**
    * @author JCargoo Community
    *
    */

    import java.util.Map;

    import org.apache.struts2.config.Result;
    import org.apache.struts2.config.Results;

    import com.opensymphony.xwork2.ActionContext;
    import com.opensymphony.xwork2.ActionSupport;
    import com.opensymphony.xwork2.validator.annotations.*;

    @Validation
    @Results( { @Result(name = "FAILURE", value = "/login.jsp"),
    @Result(name = "SUCCESS", value = "/success.jsp") })
    public class AnnotatedLoginAuthentication extends ActionSupport {

    private String username = null;

    private String password = null;

    public String execute() throws Exception {

    Map session = ActionContext.getContext().getSession();

    if (!getUsername().equals("jcargoo")
    || !getPassword().equals("jcargoo")) {
    addActionError("Invalid username and/or password! Please try again!");

    return "FAILURE";

    } else {
    //Store the username value into the session to be used by //success page.
    session.put("username", getUsername());
    return "SUCCESS";
    }

    }

    @RequiredStringValidator(message = "Please supply a username")
    public String getUsername() {

    return username;
    }

    public void setUsername(String value) {

    username = value.trim();
    }

    @RequiredStringValidator(message = "Please supply a password")
    public String getPassword() {

    return password;
    }

    public void setPassword(String value) {

    password = value;
    }

    }
    Everything is clear now; the action is validating the values received from the login page. In case of it is Okay, it dispatches the user to the success page. Otherwise, it returns back to the login page requiring the user to validate again his authentication.

    Now we should do the configuration of the action mapping in struts.xml. I know that I have told you about the zero-configuration scheme. But to be honest I wanted to use the “struts.xml” file in order to make clear how we can use this important configuration file. Be sure that this file is always useful even if we want to have the zero-configuration scheme as according to my experience, we can’t always have the zero-configuration and my further examples can confirm you this point.

    struts.xml must be put in the classes directory (WebRoot/WEB-INF/classes)


    <!DOCTYPE struts PUBLIC
    "-//Apache Software Foundation//DTD Struts Configuration 2.0//EN"
    "http://struts.apache.org/dtds/struts-2.0.dtd">
    <struts>

    <package name="LoginAuthentication" extends="struts-default">
    <action name="LoginAuthentication">
    <result>/login.jsp</result>
    </action>
    </package>


    </struts>

    Finally, here is the famous web.xml file:


    <?xml version="1.0" encoding="UTF-8"?>
    <web-app version="2.5" xmlns="http://java.sun.com/xml/ns/javaee"
    xmlns:xsi="http://www.w3.org/2001/XMLSchema-instance"
    xsi:schemaLocation="http://java.sun.com/xml/ns/javaee http://java.sun.com/xml/ns/javaee/web-app_2_5.xsd">
    <filter>
    <filter-name>struts2</filter-name>
    <filter-class>
    org.apache.struts2.dispatcher.FilterDispatcher
    </filter-class>

    <init-param>
    <param-name>actionPackages</param-name>
    <param-value>net.jcargoo</param-value>
    </init-param>

    </filter>
    <filter-mapping>
    <filter-name>struts2</filter-name>
    <url-pattern>/*</url-pattern>
    </filter-mapping>

    </web-app>


    Of course now you know already the meaning of the FilterDispatcher as it was already discussed in this post.
    The xml element init-param with value net.jcargoo tell Struts where to find annotations.

    Let’s start now by using this URL (if you keep of course the by default Tomcat configuration…)
    http://localhost:8080/struts2loginapplication/LoginAuthentication.action

    Enjoy!:


    In this example we can define the LoginAuthentication action as an annotated action (then no need to define it in the struts.xml). Then it will be something like:

    @Result( value="/login.jsp" )
    public class AnnotatedLoginWelcomeAuthenticationAction extends ActionSupport {
    /* EMPTY */
    }

    This action will be invoked like this: http://localhost:8080/struts2loginapplication/annotatedLoginWelcomeAuthentication.action

    More enhancements can be brought to this application (CSS skin, resource files, Welcome html file…) but as you may know, this can be discussed in the comments.

    If you check the html source code, you will find the following script added automatically:


    <script type="text/javascript">
    function validateForm_annotatedLoginAuthentication() {
    …
    }
    </script>

    Now you can really see the strength of the annotations.


    Read More


    Struts 2: A brand-new overview

    Posted by jcargoo | Sunday, October 19, 2008
    | 0Delicious Twitter Reddit Digg Loading...

    Let’s talk about Struts2 before providing you some examples.
    The first time I have tried to develop a strong personal application for my team in the company, struts represented the first idea which jumped off. At this time I was only able to develop with struts 1 knowing that my friend had already told me that struts knew his end 2 years ago and we will have no more enhancement regarding the framework. To be honest I searched in google but after 2 years, and found that my friend was really in the wrong as per struts 2 was already ready.
    One sample I did with Eclipse and no one more before being sure that I am handling an elegant framework at the time when I was tempted by JSF. Anyway, let’s share a glance at this cool stuff.


    Apache Struts 2 was originally known as WebWork2. WebWork and Struts joined forces to create Struts2. Struts 2 then becomes simpler and stronger (we will check this point deeply in a further post when we will talk about the both versions).
    Struts 2 isn’t just a new release of the older Struts 1 framework. It is a completely new framework, based on the esteemed OpenSymphony WebWork framework.

    Struts 2 is a second-generation web application framework that implements the
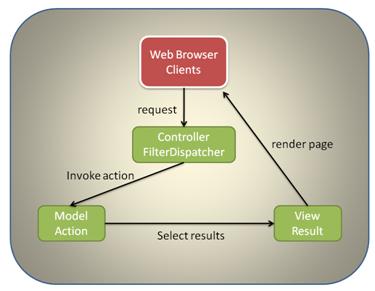
    Model-View-Controller (MVC) design pattern. As you may know The MVC pattern provides a separation of concerns that applies well to web applications. This allows managing the complexity of large software systems by dividing them into high-level components. The MVC design pattern identifies three distinct concerns: model, view, and controller. But in Struts 2, these are respectively implemented by the action, result, and FilterDispatcher.
    CONTROLLER—FILTERDISPATCHER
    The controller is out front and is the first component to act in the processing. In the figure above we can easily see that the controller’s job is to map requests to Actions. The role of the controller is played by the Struts 2 FilterDispatcher. This element is simply a servlet filter that inspects each incoming request to determine which Struts 2 action should handle the request. The framework handles the entire controller work for you. You just need to inform the framework which request URLs map to which of your actions. This can be done with XML-based configuration files or Java annotations (important topic to discuss in a further post).

    MODEL—ACTION
    What exactly is the model? The model is the internal state of the application. This state is composed of both the data model and the business logic
    As seen in the last figure, the controller, after receiving the request, must consult its mappings and determine which of these actions should handle the request. Once it finds the appropriate action, the controller hands over control of the request processing to the action by invoking it. This invocation process, conducted by the framework, will both prepare the necessary data and execute the action’s business logic. When the action completes its work, it’ll be time to render a view back to the user who submitted the request. It will just forward the result to the Struts 2 view component.

    VIEW—RESULT
    The view is the presentation component of the MVC pattern. As it was described in the figure above we can see that the result returns the page to the web browser. This page is the user interface that presents a representation of the application’s state to the user. These are commonly JSP pages, Velocity templates, or some other presentation-layer technology.

    How Struts 2 works?
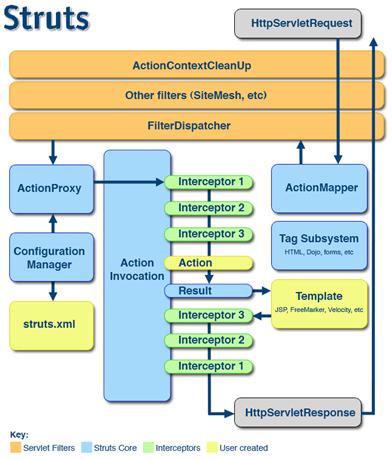
    We should say that the framework has more than just its MVC components. We said that Struts 2 provides an implementation of MVC. The MVC components are only possible with the help of a few other key architectural components that participate in processing every request. Chief among these are the interceptors, OGNL, and the ValueStack. In this figure we can see how the request processing workflow works:
    Normally we should know that in this figure the FilterDispatcher has already done its controller work by selecting the convenient action to handle the request.

    New components are mentioned like ActionContext, interceptors, the ValueStack, and OGNL. So let’s explain one by one:

    INTERCEPTORS
    As it is shown in the figure above, there is a stack of interceptors before reaching the action. The invocation must travel through this stack (most every action will have a stack of interceptors associated with it.). These interceptors are invoked both before and after the action.
    Interceptors play a huge role in the Struts 2 framework. A very good example to understand the interceptors is “Session validation”. In some web applications which need authentication, we should check out in every invocation (after being authenticated) if the session is still alive or not. When we say invocation we can say also action, then we have to check before reaching any action if the session is still valid. The idea is simply to define the reusable components that you can keep separate from your action code and which can be used before the execution of any action.

    THE VALUESTACK AND OGNL
    ValueStack is a storage area that holds all of the data associated with the processing of a request.
    OGNL is the tool that allows us to access the data we put in that central repository. It is an expression language that allows you to reference and manipulate the data on the ValueStack.

    ActionContext
    The ActionContext contains all of the data that makes up the context in which an action occurs. This includes the ValueStack but also the request, session…

    Now why don’t speak about high-level framework's architecture.

    I don’t think that we can find more clear figure that the one here provided by apache.

    I think that the figure is simple to understand now as we have already talked about the action invocation and the role of the FilterDispatcher.

    The important thing to add is that the ActionProxy consults the framework Configuration Files manager (initialized from the struts.xml file). Next step, the ActionProxy creates an ActionInvocation, which is responsible for the command pattern implementation.

    For some examples, let see the next post.


    Read More


    Tutorials

    Posted by jcargoo | Monday, December 10, 2007
    , , , , , , | 0Delicious Twitter Reddit Digg Loading...

    This is a list dedicated for my tutorials done by myself as well as all the best tutorials I continue to discover through the Web. (List updated once a month).

    My Tutorials


    Other Tutorials
    Design

    Web2.0 (jQuery, script.aculo.us, Mootools, Ajax)

    CSS
    Read More