jQuery provides a simple interface for doing all sorts of neat effects.
May be the most common type of dynamic effect you will want to perform on an element or group of elements is the simple act of showing or hiding them.
The commands for showing and hiding elements are pretty much easy to remember: show() to show the elements in a wrapped set and hide() to hide them.
jQuery hides elements by changing the display value of the style property to none. If an element in the wrapped set is already hidden, it will remain hidden but still be returned for chaining. For example, suppose we have the following HTML fragment:
<div style="display:none;">Start “hidden”</div>
<div>Start “shown”</div>
If we apply $("div").hide().addClass("cool"), we’ll end up with
the following:
Second thing to bear in mind is that if an element starts as hidden by having its display style property value explicitly set to none, the show() command will always set its display style property value to block. That’s even if the element would typically default to inline for its display value—as would a <span> element, for example. If the element starts out without an explicitly declared display value, and we use the jQuery hide() command to hide it, the show() command will remember the original value and restore it to that original display state.
So it’s usually a good idea not to use style attributes on the elements we want initially hidden, but to apply the hide() command to them in the page’s ready handler. This prevents them from being displayed on the client, and also makes sure everything is in a known initial state and will behave as expected during subsequent hide and show operations.
As you know it’s better to allow users to ask for information in details that are under their control. This is belonging to a principle known as progressive disclosure in which the data presented to users is kept to the minimum and expanded as required to perform the task at hand.
A good example of this might be filesystem tree of a computer. A better approach is to allow each level in the list of files to be opened or closed to reveal the contained hierarchical information.
We will see how to use the hide() and show() commands to instrument a nested list that acts in this manner.
To start, let’s take a look at the HTML structure of the list we will use to test our code as well as the expected result:
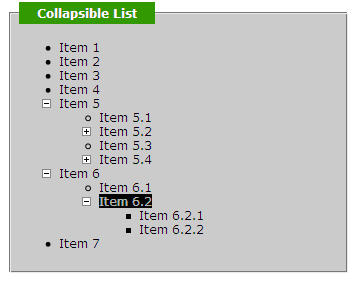
We need to visually distinguish these expandable items from those that can’t be expanded. We do that by changing the cursor to the hand when it passes over an active item, as well as replacing its list marker with the ubiquitous plus- and minus-sign graphics to indicate that the item can be either expanded or collapsed.
Let’s examine step by step how we apply this behavior to the DOM elements of the list, setting it up within the ready handler as shown here:
(1) This click handler checks to make sure that the target element of the event matches this. This is true only when the clicked item is the same as the one on which the listener was established; it allows us to ignore clicks on the child elements. This is because we only want to open and close an item when users click the parent item and not one of its children.
(2) If we determine that a parent item has been clicked, we then determine if its children are hidden or shown by employing the handy is() command using the :hidden filter. If the children are hidden, we reveal them using show(), and if shown, we hide them using hide().
(3) To prevent unnecessary propagation, we return false as the value of the listener.
Until this step, here is what we have got right now: click here.
Not really what we want as there is no hand pointer when the cursor is over an item and all lists are shown. This is why we will add the following step:
(4) We set the shape of the mouse cursor to the active pointer using the css() command. In addition to this, we hide the child elements for the active items using this by invoking the click handler and precisely its else clause.
In this step, we have accomplished the following: click here.
You may notice at this stage that the items children have a minus image which confirms that we have not correctly handled the inheritance. To fix this, we have to add part 5.
(5) This is the last step, we’ve set the 'list-style-image' style which controls the item marker of the active items to one of the plus or minus GIF images and we don’t want that setting to be inherited by the list items that are children of those items. Then the solution is to explicitly set that list-style-image style property value to none for all leaf list items. We do the same for the mouse cursor for the leaf items by setting it to the default mouse cursor shape.
Here is the final result: click here.
You want to reduce and simplify the used code?
Okay let’s use toggle!
Toggling the display state of elements between revealed or hidden is such a common occurrence that jQuery defines a command named toggle() that makes it even easier.
Let’s apply this command to the collapsible list and see how it helps to simplify the previous code.
New changes highlighted in bold.
toggle() takes care of swapping the displayed state.
Result with toggle method: click here.
You can download full code here.
<div style="display:none;" class="cool"> Start “hidden”</div>
<div style="display:none;" class="cool"> Start “shown”</div>
Second thing to bear in mind is that if an element starts as hidden by having its display style property value explicitly set to none, the show() command will always set its display style property value to block. That’s even if the element would typically default to inline for its display value—as would a <span> element, for example. If the element starts out without an explicitly declared display value, and we use the jQuery hide() command to hide it, the show() command will remember the original value and restore it to that original display state.
So it’s usually a good idea not to use style attributes on the elements we want initially hidden, but to apply the hide() command to them in the page’s ready handler. This prevents them from being displayed on the client, and also makes sure everything is in a known initial state and will behave as expected during subsequent hide and show operations.
As you know it’s better to allow users to ask for information in details that are under their control. This is belonging to a principle known as progressive disclosure in which the data presented to users is kept to the minimum and expanded as required to perform the task at hand.
A good example of this might be filesystem tree of a computer. A better approach is to allow each level in the list of files to be opened or closed to reveal the contained hierarchical information.
We will see how to use the hide() and show() commands to instrument a nested list that acts in this manner.
To start, let’s take a look at the HTML structure of the list we will use to test our code as well as the expected result:
<ul>
<li>
Item 1
</li>
<li>
Item 2
...
We need to visually distinguish these expandable items from those that can’t be expanded. We do that by changing the cursor to the hand when it passes over an active item, as well as replacing its list marker with the ubiquitous plus- and minus-sign graphics to indicate that the item can be either expanded or collapsed.
Let’s examine step by step how we apply this behavior to the DOM elements of the list, setting it up within the ready handler as shown here:
$(function(){
$('li:has(ul)')// we select all list items that possess list children.
.click(function(event){// attaching a click handler to selected elements.
if (this == event.target) {//(1)
if ($(this).children().is(':hidden')) { //(2)
$(this)
.css('list-style-image','url(minus.gif)')
.children().show();
} else {
$(this)
.css('list-style-image','url(plus.gif)')
.children().hide();
}
}
return false;//(3)
})
.css('cursor','pointer')//(4)
.click();
$('li:not(:has(ul))').css({//(5)
cursor: 'default',
'list-style-image':'none'
});
});
(1) This click handler checks to make sure that the target element of the event matches this. This is true only when the clicked item is the same as the one on which the listener was established; it allows us to ignore clicks on the child elements. This is because we only want to open and close an item when users click the parent item and not one of its children.
(2) If we determine that a parent item has been clicked, we then determine if its children are hidden or shown by employing the handy is() command using the :hidden filter. If the children are hidden, we reveal them using show(), and if shown, we hide them using hide().
(3) To prevent unnecessary propagation, we return false as the value of the listener.
Until this step, here is what we have got right now: click here.
Not really what we want as there is no hand pointer when the cursor is over an item and all lists are shown. This is why we will add the following step:
(4) We set the shape of the mouse cursor to the active pointer using the css() command. In addition to this, we hide the child elements for the active items using this by invoking the click handler and precisely its else clause.
In this step, we have accomplished the following: click here.
You may notice at this stage that the items children have a minus image which confirms that we have not correctly handled the inheritance. To fix this, we have to add part 5.
(5) This is the last step, we’ve set the 'list-style-image' style which controls the item marker of the active items to one of the plus or minus GIF images and we don’t want that setting to be inherited by the list items that are children of those items. Then the solution is to explicitly set that list-style-image style property value to none for all leaf list items. We do the same for the mouse cursor for the leaf items by setting it to the default mouse cursor shape.
Here is the final result: click here.
You want to reduce and simplify the used code?
Okay let’s use toggle!
Toggling the display state of elements between revealed or hidden is such a common occurrence that jQuery defines a command named toggle() that makes it even easier.
Let’s apply this command to the collapsible list and see how it helps to simplify the previous code.
New changes highlighted in bold.
$(function(){
$('li:has(ul)')
.click(function(event){
if (this == event.target) {
$(this).children().toggle();
$(this).css('list-style-image',
($(this).children().is(':hidden')) ?
'url(plus.gif)' : 'url(minus.gif)');
}
return false;
})
.css('cursor','pointer')
.click();
$('li:not(:has(ul))').css({
cursor: 'default',
'list-style-image':'none'
});
});
toggle() takes care of swapping the displayed state.
Result with toggle method: click here.
You can download full code here.
 How to encourage this blog if you like it:
- Promote our sponsors;
- Add any kind of comment or critic;
- Ask me directly by email if you prefer.


 I am
I am