Showing posts with label jQuery. Show all posts

jQuery Revolution in Ajax Field – Part 2

Posted by jcargoo | Sunday, December 6, 2009
| 0Delicious Twitter Reddit Digg Loading...


This article is part of the jQuery Revolution in Ajax Field series.


This is the second article in the “jQuery Revolution in Ajax Field” series.
As I told you in the first article, we are going to see more closely the Ajax handling by jQuery with some examples to better understand the utility functions used to handle/manipulate data from the server.

Load response from server-side resource

More about load()
Last time we have seen a simple glimpse about how jQuery can handle Ajax with a clean manner.
We stopped at the load(); the basic function which initiates an Ajax request.
Now the thing which I did not said - normal, it was just a glimpse: is that jQuery provides you the ability to filter the elements which are in the response.

You did not understand, ok, here is an example:

Suppose that I want only div elements of the response which will be inserted in the ourAjaxDiv div. This means that I don’t prefer to have the complete response enclosed in my principal div which is supposed to wrap this response.

This is what we call; to filter response elements.

The code will be like so:

$('#ourAjaxDiv').load('/server/application/url #div');

It is not enough, I need more
In this same context of data handling, let’s talk now about another more advanced function called serialize().
This function collects information from form control elements (considered as request parameters) for the wrapped set in a sort of string.

NB: serialize() requires that form fields have a name attribute.

Based on the simple example of serialize() given in the official jQuery documentation, here is how it works:
I think that there is nothing to develop after this schema. It shows clearly what is the result you can get when using serialize() applied to a classic form.

If the serialize() function result is not convenient for you because it is a string, you can use serializeArray() which puts the values of all successful form controls into an array of objects containing the names and values of the controls like this:

[{name: 'Salutation', value: 'Mrs'}, {name: 'Radio', value: 'No'}]

More control of the response

Now, what if we don’t need jQuery to put the response in an HTML content (ourAjaxDiv div)?
In other words, we want simply to handle or to do what we want of this data returned from the server.

Answer: Let’s try $.get() function which returns an XHR instance.

As its name implies, this function initiates a GET request to the server. For more details, check the official documentation here.

An example to show how to use this function will be helpful:
Download the full example here

If you run this example in your server, you will obviously find that it is simple.
Once you click on the following hyperlink:

<body>
<a href="#" id="link">About Me?</a>
</body>

The GET request is made to server.php as shown above. This server resource will make an idiom containing the tree parameters values passed in the request before returning this idiom in the response.
server.php

<?php
$aboutme = "Hey! I am " .$_GET['Name']. ". I am " .$_GET['Age']. " years old and I live in " .$_GET['Country'];
echo $aboutme;
?>

The alert function will be triggered as soon as the data from the server is ready in order to display this data.
The alert function is inside what we call; the callback function.

More complicated response handling

About JSON?
JSON (JavaScript Object Notation) is a lightweight data-interchange format. For more details about JSON, you can check the official site of JSON.
There is another function called $.getJSON() which returns an XHR instance.

This function initiates too the GET request with the same command syntax as $.get(). However, the response is interpreted as a JSON string before it will be passed to the callback function.

Why we need this function?
In many cases, we find ourselves requested to deal with an XML returned from the server. As a data transfer mechanism, if the XML is not suitable, JSON is recommended to be used. It avoids dealing directly with the complexity of handling the XML.

I suggest that we dedicate the coming Ajax revolution article to talk only about $.getJSON() utility function. I will build with you a personal computers retail web application.

The idea is to build an application in which the major care is to keep the end-user with most up-to-date information about what the “PC Company” has in its products stock.

I believe that the coming example will be enough to cover this section.

So, please don’t miss the third article about $.getJSON().
Read More


jQuery Revolution in Ajax Field – Part 1

Posted by jcargoo | Monday, November 23, 2009
| 0Delicious Twitter Reddit Digg Loading...


This article is part of the jQuery Revolution in Ajax Field series.


jQuery does not stop to seduce by its simplicity and capability a mess of web developers.
Every web developer cannot deny the significance of Ajax (Asynchronous JavaScript and XML) in the Rich Internet Applications field (RIA). Thus, I have chosen to begin with how jQuery makes Ajax cleaner and simple to follow.

This is the first article teaching advanced jQuery with a very simple method.


Talking about the XHR instance

First what is XHR?

XHR or XMLHttpRequest is a JavaScript object which helps you to send HTTP requests to a web server and load a response data from this same server.
XHR is your hand to use Ajax in your applications.
The problem with XHR is that different browsers implement it in different ways!
The worst thing is that the XHR is not defined (or not recognized) in some browsers (like IE5 and 6 which are using ActiveXObject instead).

What to do then?

Use the object detection technique which consists to test the browser’s capabilities and not what is the current browser or version used.
And as we want to create an instance of XHR (to play with Ajax), here is a conform manner for all browsers:


Now you can be sure that you have all means to set up (or off) a request to the server thanks to this XHR instance.

But wait HOW?

First we are going to use a property of the XHR instance called: onreadystatechange.

onreadystatechange property (of XHR instance) stores the function that will process the response from the web server (to be called automatically).
And here is the way we will use it for:

What does that mean?
  1. readyState property is about to show the current state of the request (for more details about the associated numeric codes see this);
  2. A complete request does not mean of course that it was successful. So this is why we have to check the status property of the XHR instance to know if whether this request was successful or not (Example; 404 for not found and for more details: Check out here).
Here is a high-level scheme about how it will work before we talk about the response:

Let’s get into how to deal with the response from a fresh completed request.
Note that the response format can be a kind of plain text, a JavaScript object, an HTML fragment, or a sort of JavaScript Object Notation (JSON) format.
The body content returned in the response can be found in the XHR instance property: responseText.

What is left?

Only two following lines:

xhr.open('GET','/server/application/url');
xhr.send(null);

  1. The open method defines the HTTP method (GET or POST) and the URL to be used. So we say that it establishes the connection to the server;
  2. The send method initiates the request. Here we say that it sends the ready request to the server.
If you choose to use POST method, you should write properly the value to put inside the send method (to be URI-encoded). Example:

xhr.send('x=16&y=17');

To sum up, here is roughly a code snippet to perform properly your Ajax request. ourAjaxDiv is the id of the div in which we want to put our response:

var xhr;
if (window.XMLHttpRequest) {
xhr = new XMLHttpRequest();
}
else if (window.ActiveXObject) {
xhr = new ActiveXObject("Microsoft.XMLHTTP");
}
else {
throw new Error("This browser does not support XHR!”);
}

xhr.onreadystatechange = function() {
if (xhr.readyState == 4) {
if (xhr.status >= 200 && xhr.status < 300) {
//success
document.getElementById('ourAjaxDiv').innerHTML = xhr.responseText;
}
else {
//failure
}
}
}

xhr.open('GET','/server/application/url');
xhr.send(null);


All these code lines above should be compressed in only one line thanks to jQuery:


This was the equivalent code in jQuery ! How do you find it?

There is another thing more important than this equivalent code. It is merely the fact that jQuery handles for us quite a few issues that we can have when we get the response body.

For more details about this function, please check out the great documentation of jQuery official site: Link.
This was a first glimpse about the strength of jQuery about how it handles the communication with the server with a clean and easy JavaScript code.
The next articles related to this topic will talk more closely about Ajax handling by jQuery. We will see with examples how we can use some functions like $.getJSON, $.get, $.post, $.ajax and others.
Without your comments and suggestions, this should not succeed. So please don't hesitate to ask!
Read More


jQuery Revolution in Ajax Field

Posted by jcargoo | Friday, November 20, 2009
| 0Delicious Twitter Reddit Digg Loading...

A series of articles on how jQuery can make cleanly Ajax in the Rich Internet Applications. I cover the most used and useful jQuery Ajax commands with examples. For some ones of you, this can be considered as refreshment. For others, the series can really help you to have a good point of jQuery Ajax initiation.


jQuery Revolution in Ajax Field – Part 1
Talking about the XHR instance and jQuery Ajax command; load()...


jQuery Revolution in Ajax Field – Part 2
More about load(), serialize(), serializeArray() and an introduction to JSON ($.getJSON())...


Read More


How to Use PHP and jQuery to Create a Submit News Form

Posted by jcargoo | Tuesday, November 17, 2009
, | 0Delicious Twitter Reddit Digg Loading...

At some point you may need to have a submit news application in your website. I will not talk about the advantage of creating of such functionality. However, the purpose of this tutorial is to show you how you can create a smart submit news feature.


If you wish have a complete submit news application with all the features you need inside (captcha, more security, send email confirmation, tooltips, flag moderation for admin…), please get in touch with me and I will help you to perform that.

Scenario

You have a form you have to fill out. Every element has a special condition to be verified before being inserted in the database.
As soon as all defined conditions are validated, all information will be stored in a dedicated SQL. The stored segment table will contain then all the required article elements. All this will be performed thanks to AJAX.
Here's the sequence of events that will take place here:
  • The page shows the HTML form;
  • User fills out properly every form field and submits his article information;
  • An AJAX request will fire;
  • The filled data will be first validated and after stored in the database;
  • Once the insert step has been successfully done, a confirmation message will be displayed to the user;
  • All these steps will be done in a slick display;
  • Even when JavaScript is disabled, the article submission should work normally (but without animation effects).
Do you want to have a look of course?

Getting Started

We are going to need the jQuery library, jQuery Color plugin. We will also be using some CSS, PHP and a MySQL database to store our data.

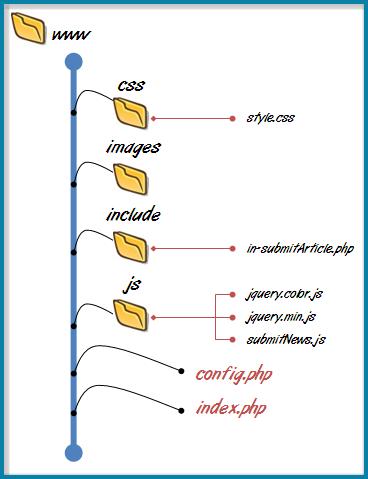
Here a detailed structure of the web application we are going to build:


HTML and CSS

The structure of the form will be as follows:

<div id="container">
<form id="form" action="index.php" method="post">
<div class="info">Submit your Article here</div>
<p>
<label for="name">Name</label>
<input type="text" name="name" id="name" />
</p>
<p>
<label for="email">Email</label>
<input type="text" name="email" id="email"/>
</p>
<p>
<label for="url">Post URL</label>
<input type="text" name="url" id="url" value="http://"/>
</p>
<p>
<label for="description">Description</label>
<textarea name="description" id="description" ></textarea>
</p>
<input name="submit" type="submit" id="submit" class="submit" value="Submit">
</form>
</div>

For the CSS, I believe that it will be pointless to show the whole CSS. So let’s talk about the most important CSS classes:

#form .error {
text-align:center;
border:solid 1px #CC0000;
background:#F7CBCA url(../images/error.png) 3px 2px no-repeat;
color:#CC0000;
font-weight:bold;
padding:4px;
margin:10px;
-moz-border-radius: 5px;
-webkit-border-radius: 5px;
}
#container .result {
text-align:center;
-moz-border-radius: 5px;
-webkit-border-radius: 5px;
border:solid 1px #90ac13;
background:#eef4d3 url(../images/ok.png) 3px 3px no-repeat;
color:#6b800d;
font-weight:bold;
padding:4px;
margin:10px;
}
.overlay {
position: absolute;
-moz-border-radius: 3px;
-webkit-border-radius: 3px;
width: 100%;
height: 100%;
background: #888888 url(../images/ajax-loader.gif) no-repeat 50% 50%;
left: 0;
top: 0;
display: none;
opacity: .9;
}

  • “error” class is supposed to be shown when the form fields are not correctly set;
  • “result" class will be used when we will confirm to the user that his article is under moderation (stored in the database);
  • “overlay” class will be activated when the AJAX call will be fired. This class will be applied in the form area with a loading progress image;
  • The whole CSS code is easy to assimilate. All is about to make beautiful our form layout.

Javascript

First, we have to call our JavaScript library and plugin to use as well as submitNews.js, a custom build which includes our JavaScript code.

<script src="./js/jquery.min.js" type="text/javascript"></script>
<script src="./js/jquery.color.js" type="text/javascript"></script>
<script src="./js/submitNews.js" type="text/javascript"></script>

The first code snippet is merely used to make a kind of special input and textarea elements by changing their background color when they receive focus/blur.
“:input” is used to match all input and textarea.

$(':input').focus(function() {
$(this).css('background-color', '#EFF5FF');
});
$(':input').blur(function() {
$(this).css('background-color', '#fff');
});

Now let’s have a look at the core of our AJAX. I will past the code here and after relate a couple of things step by step:

$('#submit').click(function(){


var name = $('#name').val().replace(/[^\d\w ]+/ig,'');
var email = $('#email').val().match(/^([a-zA-Z0-9_\-\.]+)@[a-z0-9-]+(\.[a-z0-9-]+)*(\.[a-z]{2,3})$/i) ? $('#email').val() : null;
var url = $('#url').val().match(/^(https?:\/\/)?([\da-z\.-]+)\.([a-z\.]{2,6})([\/\w \.-]*)*\/?$/) ? $('#url').val() : null;
var description = $('#description').val();

if (name.length <4 email == null url == null description.length < 4){
if ($('.error').length == 0){
$('form .info').fadeOut(200).attr("class", "error").hide().html('Please fill out each field correctly!').fadeIn(1000);
}
else{
$('.error').stop().animate({
backgroundColor : "#CC0000"
}, {
duration : 200,
complete : function() {
$(this).animate( {
backgroundColor : "#F7CBCA"
}, 600);
}
});
}

return false;
}

$.post(
'./include/in-submitArticle.php', {
'name' : name,
'email': email,
'url': url,
'description': description
},

function(r){
$('.error').fadeOut(200);
$('<div class="overlay"></div>')
.appendTo('#form')
.fadeIn(1000, function(){
$('#form')
.slideUp(800,function(){
$('#container').append('<div class="result">'+r+'</div>')
.hide()
.fadeIn(1000);
});

});


}

);

return false;// disable submit click

});

  • Once the submit button is clicked, we first pick up values filled out by user and perform some checks using regular expression method (here some details about the regular expressions used in this code: here and here);
  • We set up some conditions to check if every filled field’s value is valid or not;
  • If the defined conditions are not respected, we apply the “error” class instead of the “info” class;
  • And if the “error” class is already existing, we just animate its background to draw the attention of the user;
Now for some AJAX:

“post” function will load a remote page using an HTTP POST request.

  • The URL specified points to in-submitArticle.php;
  • in-submitArticle.php is the PHP script responsible of storing the filled article information in the database;
  • This PHP script will run on the server side with key/value sent to this server. This means that the PHP script will use these parameter values in order to be executed. I will make more comprehensible the role of this script in the right section below;
  • Before the data will be loaded successfully from the server (from in-submitArticle.php), the bundled function defined inside the post function will apply the “overlay” class (loading image inside the form section) before showing the result of article insertion with an animated show.

This is all what I can say about the main JavaScript code.

SQL

We create a database named ‘ajaxnews' and a table inside which contains all fields we need to store:
Database: ' ajaxnews'

CREATE TABLE IF NOT EXISTS `articles` (
`id` int(11) NOT NULL AUTO_INCREMENT,
`name` varchar(200) NOT NULL,
`email` varchar(200) NOT NULL,
`url` varchar(400) DEFAULT NULL,
`description` varchar(1000) DEFAULT NULL,
PRIMARY KEY (`id`)
) ENGINE=MyISAM DEFAULT CHARSET=latin1;

PHP

Let’s get to data handling posted thanks to jQuery. I will start with config.php.
This file contains the connection settings that you should customize for your own parameters:

<?php

$server = 'localhost';
$username='root';
$password='';
$db = 'ajaxnews';

define('IS_AJAX', isset($_SERVER['HTTP_X_REQUESTED_WITH']));
?>

IS_AJAX constant will help to know if AJAX request is taking place or not. This is the need to use “isset” function.

in-submitArticle.php

<?php

require 'c:\wamp\www\loginForm\config.php';

if(IS_AJAX) {
$post['name'] = trim($_POST['name']);
$post['email'] = trim($_POST['email']);
$post['url'] = trim($_POST['url']);
$post['description'] = trim($_POST['description']);
}

$mysqli = new mysqli($server, $username, $password, $db) or die('There is a problem in the connection [mysqli]');

$stmt = $mysqli->stmt_init();

if($stmt = $mysqli->prepare("INSERT INTO articles VALUES (NULL,?,?,?,?)")){

$stmt->bind_param('ssss', $post['name'], $post['email'], $post['url'], $post['description']);

if(!$stmt->execute()) die($mysqli->error);

$stmt->close();

$mysqli->close();


echo "Hey " .$post['name']. ", Thanks for Submitting!";


}

else{
echo "Problem occurred at insert step!";
}
?>

  • First, we require the config.php file because we will use all the variables we defined inside;
  • After that, we will check if AJAX is activated. If yes, the array “post” will contain all the trimmed values of the HTML form;
  • The rest is pretty simple to follow as it is regarding the standard method of connection to a database as well as the insertion using SQL language;
Now what about if JavaScript is disabled?

If you remember, the HTML form action points to index.php. The index.php script is in the following snippet:

<?php
if(isset($_POST['submit'])){
$post = array();
$error = false;
foreach($_POST as $key=>$value){
if(isset($_POST[$key]) && strlen(trim($_POST[$key]))>=4){
$post[$key] = trim($value);
}
else $error = true;

if ($key === 'email'){
if(!filter_var($value, FILTER_VALIDATE_EMAIL)) $error =true;
}

if ($key ==='url'){
if(!filter_var($value, FILTER_VALIDATE_URL)) $error =true;
}

}

if(!$error){
require './include/in-submitArticle.php';
}
else{
echo "Please fill out correctly the fields!";
}
}
?>

Here too we check if the submit button has been clicked. We also execute some verification regarding the length of the filled values and the validation of the email address and the URL using filers: FILTER_VALIDATE_EMAIL and FILTER_VALIDATE_URL.
I cannot guarantee that the filters will do the same work as the regular expressions we set up in the JavaScript code. FILTER_VALIDATE_EMAIL knows some bugs but you can use it with no worries as I continue to use it with no kind of problems.

Of course there are other ways to achieve this functionality, but keep in mind that the purpose of this tutorial is to talk easily about AJAX and PHP.

This application has been tested successfully in all famous browsers.

Thanks for reading and please feel free to ask.


Tools used to develop this application
Read also:
Read More


10 Horizontal Menus with jQuery Effects

Posted by jcargoo | Saturday, November 7, 2009
| 0Delicious Twitter Reddit Digg Loading...


Well this is a roundup of some simple horizontal menus I have developed with jQuery.
They are all free to use. You can customize the code as you like. Every menu shows a different manner to present the user interaction.


jQuery comes to make all these menus more unique and special.
Please do not hesitate to add any kind of remark to improve this work.
All menus have been successfully tested in Firefox3.5.5, IE8, Chrome 3.0.195.27 and Safari 4.0.3.
One more thing to mention is that all these menus need to be slightly improved to be full developed CSS menus.
Let's have a try?


Rounded corner (not in IE) background follows any menu link you move the mouse on it with an elastic effect.


The lightning image moves over the menu link with elastic effect.

Spice your menu with random colors when hovering.


A professional menu to add more significance to your menu.

One another elastic effect.

Give your bottom border another animation.

A colored vertical line is shown inside every menu item when hovering.

Every menu item grows when you put the mouse on.

Detailed menu content.


Every menu item has its own defined color.

Here is a code snippet for the first menu:

$('.hoverMenu1').css("left", $('.current1').offset().left).css(
"width",
parseFloat($('.current1').width(), 10)
- parseFloat($('.hoverMenu1').css("padding-left"), 10)
* 2);
$('#bar1 li a').hover(
function() {
var offset = $(this).offset();
$('.hoverMenu1').stop().animate( {
left : offset.left,
width : $(this).width()
}, 1000, 'easeOutElastic');
},
function() {
$('.hoverMenu1').stop().animate(
{
left : $('.current1').offset().left,
width : parseFloat($('.current1').width(), 10)
- parseFloat($('.hoverMenu1').css(
"padding-left"), 10) * 2
}, 600, 'easeOutBounce');
});


jQuery plugins used : jquery.easing.1.3.js and jquery.color.js.

Read also :
7 Vertical Menus With jQuery Effects

Read More


Overlay Text over an Image with a Very Simple jQuery Snippet

Posted by jcargoo | Monday, August 10, 2009
, | 0Delicious Twitter Reddit Digg Loading...

This post will show you how much jQuery is helpful to give a trendy face of the presentation of your images.
There are some developers who want only to put fixed text messages above the images. But there are others who like to add some spices to their images look.


This code which I will show you has been developed to be clear and simple as much as possible.


The main idea behind consists to let user get the comment (or explanation) of the image he is hovering. This comment will appear when the user hover over the image, and will disappear when the mouse is out of the image.

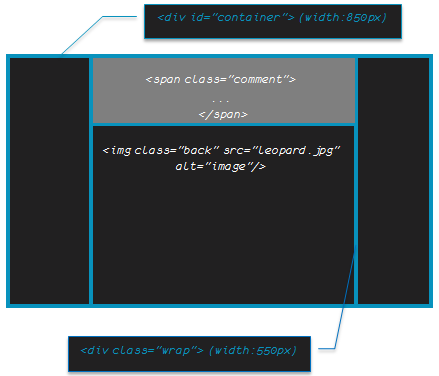
So here I go. Our schematic will be like following:


Then the HTML code is:


<div id="container">
<div class="wrap">
<img class="back" src="leopard.jpg" alt="image"/>

<span class="comment">
Apple - Mac OS X Snow Leopard <br/> The world's most advanced OS
</span>
</div>
</div>

Note that the width/height of the wrap div is the same as those of the image.

The CSS is also simple to understand:

#container {
width: 850px;
text-align: center;
margin: auto;
}

.back
{
position:absolute;
top:0;left:0;
}
.wrap
{
width:550px;
height:390px;
position:relative;
margin:auto;
overflow:hidden;
}

.comment
{
position:absolute;
width:550px;
top:400px;
left:0px;
letter-spacing: -1px;
color: white; font: 24px/45px Berlin Sans FB, Sans-Serif;
background: #4A4D4A;
padding: 10px;
filter:alpha(opacity=60);
-moz-opacity:0.6;
-khtml-opacity: 0.6;
opacity: 0.6;
line-height: 90%
}

  • The image class as well as the comment class should have absolute position in order to have the comment to be stuck on the image. Thus, the wrap class should be defined with relative position;
  • The overflow should be set to hidden for wrap class. This is done to hide the comment when it goes back;
  • There are the only important things to talk about. Otherwise, the rest of the parameters is clear to devour.

Finally, let’s talk about jQuery code. This code is a way to fulfill our task which is spicing our image look.


$(function(){

$('.wrap').hover(function(){
$(this).children('.comment').stop().css("top", "0px");}

, function(){
$(this).children('.comment').stop().animate({"top": '400px'}, 600);});

});


We used hover jQuery event. The top value of the comment was 400px, which means that it was out of our eyesight. Now jQuery helps us to resotre it (set the top value to 0). Since the mouse is out of the image, the second function is fired with some animation thanks to jQuery effect.

For any kind of suggestion, please don’t hesitate.


Tested successfully in Safari, FF, IE and Chrome (last versions)
Read More


20 Awesome Navigation Menus

Posted by jcargoo | Monday, April 13, 2009
| 0Delicious Twitter Reddit Digg Loading...

Website Menus need to be simple, user-friendly, well-designed or at least clear and obvious. This is the first point to consider before designing any menu as all menus are the important elements to guide your visitor through your website.
The purpose of this article is to present you 20 navigation menus which I find perfectly designed.

In other words, they are all excellent. Of course, there are so many menus that you can continue to discover everyday through the web but these menus below are my favorite.
These menus will also give you a sort of inspiration to help you to design your own navigation menu. Every menu is well-matched with the style of its website.
All these navigation menus are either CSS-based or JavaScript&CSS-based.

For any suggestion about other CSS-based or JavaScript-CSS-based navigation menu (s) please just leave a comment.

1 - Hopking Design


2 - Nopoko Graphics


3 - Mars Hill


4 - 24 ways


5 - Wards Exchange


6 - Jayme Blackmon


7 - Nathan Borror


8 - Ten Thousand Things


9 - Students Against Destructive Decisions


10 - Folietto


11 - Clothing + Kindness


12 - Navigant Consulting


13 - Sitesquared


14 - Web Designer Wall


15 - Aviary


16 - Acko.net


17 - House of spring mix


18 - Studio Racket


19 - Artgeex


20 - Design Intellection


Read More


Validation Messages for Form Fields with jQuery

Posted by jcargoo | Tuesday, April 7, 2009
| 0Delicious Twitter Reddit Digg Loading...

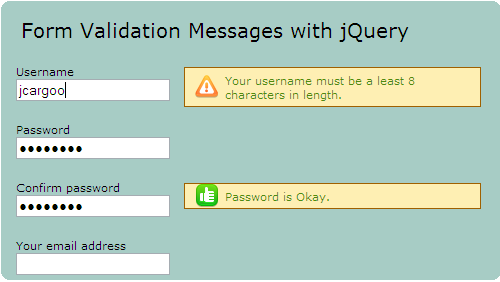
Validation hints are useful for any kind of form. It is useful because the user remains aware about the validation of the field criteria he is trying to fill in.
This post is about showing you how to create this kind of feedback using jQuery and

CSS.


Let’s go through the code.

General behavior:

HTML

<input
type="XXYY"
id="XXXX"/>
<span class="message">XXXX message.</span>

Since any input element receives focus either via the pointing device or by tabbing navigation, the focus event fires and executes following function:

$("input").focus( function() {$(this).parent().find("span.message").css("display", "inline");});

This means that we will display the message inside the span element.

When any input element loses focus either via the pointing device or by tabbing navigation, the following function will be executed:

$("input").blur( function() {$(this).parent().find("span.message").css("display", "none");});

This means that we will hide the message inside the span element.

The span message will be displayed following its CSS class definition:

span.message {
display:none;
position:absolute;
font:normal 11px/14px verdana;
width:250px;
margin: -12px 0 0 14px;
padding:5px 5px 5px 40px;
border: 1px solid #9F6000;
background-repeat: no-repeat;
background-position: 10px center;
color: #4F8A10;
background-color: #FEEFB3;
background-image:url('warning.png');
}

Username:

jQuery:

$("#username").keyup( function() {
var fieldset = $(this).parent();
var text = $(this).val();
if (text.length > 7) {
fieldset.addClass("done");
}
else {
fieldset.removeClass("done");
}
});

  • We merely check the length of the value entered in the username field when the keyup event is triggered;
  • If it is okay (text length value is higher than 8), we apply the CSS class “done” and if not, the warning message “span.message” remains applied.

CSS:

fieldset.done span.message {
border: 1px solid #4F8A10;
background-repeat: no-repeat;
background-position: 10px center;
color: #4F8A10;
background-color: #DFF2BF;
background-image:url('success.png');
}
Password and Password confirmation:

jQuery:

$("#password").keyup( function() {
var fieldset = $(this).parent();
var text = $(this).val();
if (text.length > 3 && text.length <> 7) {
fieldset.removeClass("almostgood");
fieldset.addClass("done");
} else {
fieldset.removeClass("almostgood");
fieldset.removeClass("done");
}
});

$("#password1").keyup( function() {
var fieldset = $(this).parent();
var text = $(this).val();
if(text!=$("#password").val() && jQuery.trim($("#password").val())!=""){
$("#passwordok").css("display", "none");
$("#passwordnok").css("display", "inline");
}
else{
if(text==$("#password").val()){
$("#passwordnok").css("display", "none");
$("#passwordok").css("display", "inline");
}
if(jQuery.trim($("#password").val())==""){
$("#passwordnok").css("display", "none");
$("#passwordok").css("display", "none");
}
}
});

  • If we find that the password is at least 4 characters long, this can be good enough to continue. Then the “almostgood” CSS class will be applied;
  • If the password is at least 8 characters long, that's very good and the “done” CSS class will be applied in this case;
  • The second keyup event above concerns password comparing. In case of #password and #password1 values are the same; “passwordok” CSS class will be applied. In the opposite case, it is CSS class “passwordnok”.
CSS:

fieldset.done span.message {
border: 1px solid #4F8A10;
background-repeat: no-repeat;
background-position: 10px center;
color: #4F8A10;
background-color: #DFF2BF;
background-image:url('success.png');
}

fieldset.almostgood span.message {
border: 1px solid #9F6000;
background-repeat: no-repeat;
background-position: 10px center;
color: #4F8A10;
background-color: #FEEFB3;
background-image:url('almostgood.png');
}

#passwordnok{
font:normal 11px/14px verdana;
width:250px;
position:absolute;
margin: -12px 0 0 14px;
padding:5px 5px 5px 40px;
border: 1px solid #9F6000;
background-repeat: no-repeat;
background-position: 10px center;
color: #4F8A10;
background-color: #FEEFB3;
background-image:url('passnok.png');
display:none;
}

#passwordok{
font:normal 11px/14px verdana;
width:250px;
position:absolute;
margin: -12px 0 0 14px;
padding:5px 5px 5px 40px;
border: 1px solid #9F6000;
background-repeat: no-repeat;
background-position: 10px center;
color: #4F8A10;
background-color: #FEEFB3;
background-image:url('passok.png');
display:none;
}

Email:

jQuery:

$("#email").keyup( function() {
var fieldset = $(this).parent();
var text = jQuery.trim($(this).val());
if (text.match(/^\w+([\.-]?\w+)*@\w+([\.-]?\w+)*(\.\w{2,3})+$/)) {
fieldset.addClass("done");
} else {
fieldset.removeClass("done");
}
});

  • We simply use regular expressions to validate the e-mail field.

That’s all guys.

Read More


A jQuery Tabbed Box

Posted by jcargoo | Tuesday, February 24, 2009
| 0Delicious Twitter Reddit Digg Loading...

This article will show you how to create a tabbed box and how jQuery can be useful to let you play with the tabs.


Let’s show first the high-level structure:
HTML

<div id="wrap">
<div class="tabbed">
<ul class="tabs">
<li><a id="1" href="#">My Mail</a></li>
<li><a id="2" href="#">RSS</a></li>
<li><a id="3" href="#">PHP Courses</a></li>
<li><a id="4" href="#">jQuery for All</a></li>
</ul>
<div id="1" class="content">
<center><h3>Tab1</h3></center>
<p>Sed ut perspiciatis...</p>

</div>
<div id="2" class="content">
<center><h3>Tab2</h3></center>
<p>eum iure reprehenderit, qui ...</p>
</div>
<div id="3" class="content">
<center><h3>Tab3</h3></center>
<p> iusto odio dignissimos...</p>
</div>
<div id="4" class="content">
<center><h3>Tab4</h3></center>
<p>voluptatem sequi...</p>
</div>
</div>
</div>


The code above is made up of:

+ Principal wrapper (wrap class);

CSS

#wrap {
width: 400px;
font-size: 12px;
margin: 20px auto;
border:1px solid #494e52;
background-color:#636d76;
padding:8px;
}


+ Another wrapper (tabbed class) that holds the whole tabbed box;

CSS

.tabbed {
width: 400px;
background: #39414A repeat-x bottom;
}

+ A list (tabs class) which contains all the 4 tabs;

CSS

.tabbed {
width: 400px;
background: #39414A repeat-x bottom;
}

.tabbed .tabs li {
list-style: none;
float: left;
}

.tabbed .tabs li a {
display: block;
width: 99.25px;
padding: 5px 0;
font-weight: bold;
text-align: center;
text-decoration: none;
color: #fff;
background: #181C21 repeat-x bottom;
border-left: 1px solid #fff;
border-bottom: 1px solid #fff;
}

.tabbed .tabs li:first-child a {
border-left: none;
}

.tabbed .tabs li a:hover {
color: #B4CBD9;
}

.tabbed .tabs li a:focus {
outline: none;
}


The width of “tabbed .tabs li a” was calculated as follows:
- We have “.tabbed .tabs li:first-child a” has no left border;
- Then we have only 3 border-left of 1 px;
- The full width is 400px.

So: (400px – 3 * 1px)/4 = 99.25px

+ 4 Divs (content class) considered as containers of all tabs.

CSS

.content{
display: none;
border:1px solid #fff;
}

.content p{
padding: 20px 10px 10px 10px;
color:#C0D0C0;margin: 1em 0;
}


jQuery:

$(document).ready(function() {

$("#wrap").corner("round 10px");

$(".tabs li a").click(function(event) {
$(".tabbed .content").css("display", "none");
$(".tabbed .tabs li a").removeClass("active");
$(this).addClass("active");
$(".tabbed .content[@id="+$(this).attr("id")+"]").fadeIn("def");
});

$(".tabs li a[@id=1]").click();

});


In order to have a round corner for wrap class, I have chosen to use the Corner jQuery plugin.

Our code is very simple to understand. We first choose to display only the tab content that we prefer thanks to: $(".tabs li a[@id=1]")
Now you may know why we have an id for every anchor that matches the same id defined in the content class for div element.

Example:

<li><a id="X" href="#">HHHHH</a></li>
...
<div id="X" class="content">
...

The active class applied when the click event is triggered for each matched element is:

.tabbed .tabs li a.active {
background: #fff;
color: #B4CBD9;
}

Finally, the fadeIn effect was used to show the content of every tab.
That’s all.
Read More


7 Vertical Menus With jQuery Effects

Posted by jcargoo | Sunday, February 8, 2009
| 0Delicious Twitter Reddit Digg Loading...

7 Useful effects (accordion, bounce…) that you can use to animate your vertical menus with only one level have been gathered in this post.
Two of the menus are using the powerful jQuery Easing Plugin (version 1.3) and the rest is simply using the css and animate functions in order to create custom

animations.


All the menus are chiefly having a common HTML structure:
<ul class="cssclassone">
<li><a class="cssclasstwo" href="#">Home</a></li>
<li><a href="#">Blog</a></li>
<li><a href="#">Portfolio</a></li>
<li><a href="#">CV</a></li>
<li><a href="#">Projects</a></li>
<li><a href="#">Contact Me</a></li>
</ul>
We have chosen to write a simple jQuery code just to make sure to be able to understand how every effect for every right menu is working.
Every effect is triggered thanks to mouseover and mouseout events. For menu D for example, we simply use the jquery.min.js script to create our custom animation using css function to change the background color value and animate function to change the padding-left css property value.
/*Menu D*/
$(".menu2 .menu2_liste li a").mouseover(function () {
$(this).css("background-color","#FFFFFF");
$(this).animate({ paddingLeft: "50px" }, 50 );
});

$(".menu2 .menu2_liste li a").mouseout(function () {
$(this).css("background-color","#ECEFF5");
$(this).animate({ paddingLeft: "4px" }, 50 );
});
Menu E is using the jQuery Easing Plugin (file jquery.easing.1.3.js) with 'easeOutBounce' easing type to make every menu tab to vertically bounce.
/*Menu E*/
$(".sliding-element1 a").mouseover(function(){
$(this).stop().animate({width:'250px'},{queue:false, duration:600, easing: 'easeOutBounce'});
});

$(".sliding-element1 a").mouseout(function(){
$(this).stop().animate({width:'148px'},{queue:false, duration:600, easing: 'easeOutBounce'});
});
Of course this is an unvarnished code which lets you to customize it with your favorite colors and style.
That’s all.
Important: Thanks to Shin, I have added .stop() to every menu script now to get a real accordion effect. Just refresh your browser cache in order to view the “new” live demo.
Read More