jQuery Revolution in Ajax Field – Part 2

Posted by jcargoo | Sunday, December 6, 2009
| 0Delicious Twitter Reddit Digg Loading...


This article is part of the jQuery Revolution in Ajax Field series.


This is the second article in the “jQuery Revolution in Ajax Field” series.
As I told you in the first article, we are going to see more closely the Ajax handling by jQuery with some examples to better understand the utility functions used to handle/manipulate data from the server.

Load response from server-side resource

More about load()
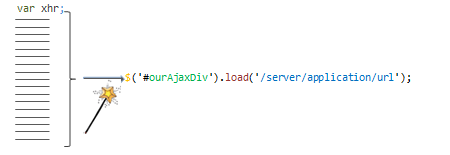
Last time we have seen a simple glimpse about how jQuery can handle Ajax with a clean manner.
We stopped at the load(); the basic function which initiates an Ajax request.
Now the thing which I did not said - normal, it was just a glimpse: is that jQuery provides you the ability to filter the elements which are in the response.

You did not understand, ok, here is an example:

Suppose that I want only div elements of the response which will be inserted in the ourAjaxDiv div. This means that I don’t prefer to have the complete response enclosed in my principal div which is supposed to wrap this response.

This is what we call; to filter response elements.

The code will be like so:

$('#ourAjaxDiv').load('/server/application/url #div');

It is not enough, I need more
In this same context of data handling, let’s talk now about another more advanced function called serialize().
This function collects information from form control elements (considered as request parameters) for the wrapped set in a sort of string.

NB: serialize() requires that form fields have a name attribute.

Based on the simple example of serialize() given in the official jQuery documentation, here is how it works:
I think that there is nothing to develop after this schema. It shows clearly what is the result you can get when using serialize() applied to a classic form.

If the serialize() function result is not convenient for you because it is a string, you can use serializeArray() which puts the values of all successful form controls into an array of objects containing the names and values of the controls like this:

[{name: 'Salutation', value: 'Mrs'}, {name: 'Radio', value: 'No'}]

More control of the response

Now, what if we don’t need jQuery to put the response in an HTML content (ourAjaxDiv div)?
In other words, we want simply to handle or to do what we want of this data returned from the server.

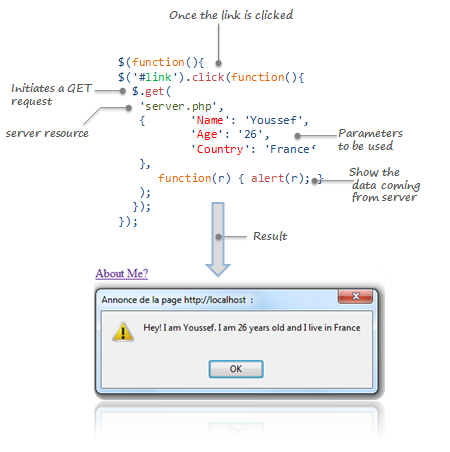
Answer: Let’s try $.get() function which returns an XHR instance.

As its name implies, this function initiates a GET request to the server. For more details, check the official documentation here.

An example to show how to use this function will be helpful:
Download the full example here

If you run this example in your server, you will obviously find that it is simple.
Once you click on the following hyperlink:

<body>
<a href="#" id="link">About Me?</a>
</body>

The GET request is made to server.php as shown above. This server resource will make an idiom containing the tree parameters values passed in the request before returning this idiom in the response.
server.php

<?php
$aboutme = "Hey! I am " .$_GET['Name']. ". I am " .$_GET['Age']. " years old and I live in " .$_GET['Country'];
echo $aboutme;
?>

The alert function will be triggered as soon as the data from the server is ready in order to display this data.
The alert function is inside what we call; the callback function.

More complicated response handling

About JSON?
JSON (JavaScript Object Notation) is a lightweight data-interchange format. For more details about JSON, you can check the official site of JSON.
There is another function called $.getJSON() which returns an XHR instance.

This function initiates too the GET request with the same command syntax as $.get(). However, the response is interpreted as a JSON string before it will be passed to the callback function.

Why we need this function?
In many cases, we find ourselves requested to deal with an XML returned from the server. As a data transfer mechanism, if the XML is not suitable, JSON is recommended to be used. It avoids dealing directly with the complexity of handling the XML.

I suggest that we dedicate the coming Ajax revolution article to talk only about $.getJSON() utility function. I will build with you a personal computers retail web application.

The idea is to build an application in which the major care is to keep the end-user with most up-to-date information about what the “PC Company” has in its products stock.

I believe that the coming example will be enough to cover this section.

So, please don’t miss the third article about $.getJSON().
Read More


Provide a Cool jQuery Plugin Link and Win a Google Wave Invitation

Posted by jcargoo | Monday, November 30, 2009
| 0Delicious Twitter Reddit Digg Loading...

I have only 4 invitations (should have probably more in the coming days).
What I suggest you to do is just to put in your comment a link to a nice jQuery Plugin done by you or by another person as well as your real email address in the comment form below.

This post will be valid during one week. After that, I will sort and send Wave invitations for the 4 winners who have posted the most amazing jQuery Plugins :)
Good luck!
Update:
Unfortunately, the contribution was too poor and the given plugins are no that excellent (sorry).
But, I am pleased to invite you all of you (jquery_lover, maria, pedro, englishdoggy).
I still have more invitations for the ones interested...
Read More


5 Message Boxes to Style your Notifications with CSS

Posted by jcargoo | Saturday, November 28, 2009
| 0Delicious Twitter Reddit Digg Loading...

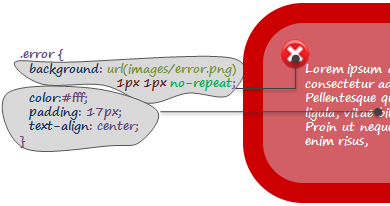
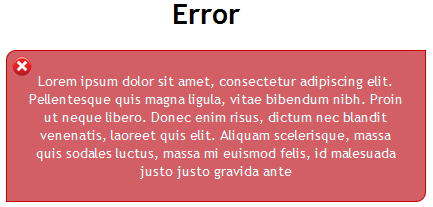
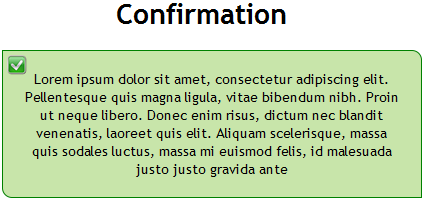
Alert boxes are well-known in all kind of applications. A stylish alert box is a good way to show you creativity but of course before that; get the full user’s attention.

This article will present you two things: 5 free notification boxes to use/customize as well as a very simple technique about how to create your own ones inspired from this roundup. You will see that the power of CSS will widely help our needs. First, let’s have a look at the outcome.

I have no enough time to go design corners using a drawing tool. This is why and for a simple use, I choose to use online tools like:


This generator will suit exactly what we need to create round corners.
Now, let’s have a look at the global HTML shared by all message boxes:

<div class="top-...">
<div class="bottom-...">
<div class="left-...">
<div class="right-...">
<div class="border-right-...">
<div class="bottom-left-...">
<div class="top-right-...">
<div class="top-left-...">
<div class="...">Lorem ipsum dolor sit amet, consectetur adipiscing elit. Pellentesque quis magna ligula,

vitae bibendum nibh. Proin ut neque libero. Donec enim risus, dictum nec blandit venenatis, laoreet quis elit. Aliquam

scelerisque, massa quis sodales luctus, massa mi euismod felis, id malesuada justo justo gravida ante</div>
</div>
</div>
</div>
</div>
</div>
</div>
</div>
</div>

Explanation
  • We have defined 8 main CSS classes. Every class will define either the border or the corner to be used (top, right, bottom, left);
  • Depending on which kind of box we will use in each box, the total of the CSS classes should be different from a box to another.
I will take a general example to show how our round corners will be implemented. This following figure will focus only on two CSS classes top-left-error and top-error. All the rest of classes will apply the same steady method:

Step 1:

The generated corner; top-l-err.png (by the online tool presented above) has 3 properties:
  • A white background: you can choose your own depending on what is the background you are using in your template;
  • A border color: Same color of the defined box border;
  • A foreground color: This is the same as the content color of the box.
top-l-err.png will be placed in the top left of the box thanks to top-left-error CSS class.
Here you can understand the importance of the white background of top-l-err.png which will hide the “real” box border.

Step 2:

dot-err.png (1x1) is repeated horizontally thanks to top-error CSS class in order to define a top border for our box.
As I said before, this same method will be applied for the rest of borders/corners. We only need to modify the starting position of the background image as well as background colors.
Now to style our message box content, we will use for every kind of box a dedicated class. Here is an example of how we style the error message box:

Here is the final result for each kind of message box:


It is over to you now to use the same boxes or to customize (colors, corner radius, background images…) depending on your needs.
Read also:
Read More


The Friday Post: 10 Nice Wallpapers for Linux Users

Posted by jcargoo | Friday, November 27, 2009
| 0Delicious Twitter Reddit Digg Loading...

This following entry is dedicated to Linux users (Debian, Fedora, Ubuntu…). This is my collection of some beautiful desktop wallpapers for this week.


Enjoy !
Read More


jQuery Revolution in Ajax Field – Part 1

Posted by jcargoo | Monday, November 23, 2009
| 0Delicious Twitter Reddit Digg Loading...


This article is part of the jQuery Revolution in Ajax Field series.


jQuery does not stop to seduce by its simplicity and capability a mess of web developers.
Every web developer cannot deny the significance of Ajax (Asynchronous JavaScript and XML) in the Rich Internet Applications field (RIA). Thus, I have chosen to begin with how jQuery makes Ajax cleaner and simple to follow.

This is the first article teaching advanced jQuery with a very simple method.


Talking about the XHR instance

First what is XHR?

XHR or XMLHttpRequest is a JavaScript object which helps you to send HTTP requests to a web server and load a response data from this same server.
XHR is your hand to use Ajax in your applications.
The problem with XHR is that different browsers implement it in different ways!
The worst thing is that the XHR is not defined (or not recognized) in some browsers (like IE5 and 6 which are using ActiveXObject instead).

What to do then?

Use the object detection technique which consists to test the browser’s capabilities and not what is the current browser or version used.
And as we want to create an instance of XHR (to play with Ajax), here is a conform manner for all browsers:


Now you can be sure that you have all means to set up (or off) a request to the server thanks to this XHR instance.

But wait HOW?

First we are going to use a property of the XHR instance called: onreadystatechange.

onreadystatechange property (of XHR instance) stores the function that will process the response from the web server (to be called automatically).
And here is the way we will use it for:

What does that mean?
  1. readyState property is about to show the current state of the request (for more details about the associated numeric codes see this);
  2. A complete request does not mean of course that it was successful. So this is why we have to check the status property of the XHR instance to know if whether this request was successful or not (Example; 404 for not found and for more details: Check out here).
Here is a high-level scheme about how it will work before we talk about the response:

Let’s get into how to deal with the response from a fresh completed request.
Note that the response format can be a kind of plain text, a JavaScript object, an HTML fragment, or a sort of JavaScript Object Notation (JSON) format.
The body content returned in the response can be found in the XHR instance property: responseText.

What is left?

Only two following lines:

xhr.open('GET','/server/application/url');
xhr.send(null);

  1. The open method defines the HTTP method (GET or POST) and the URL to be used. So we say that it establishes the connection to the server;
  2. The send method initiates the request. Here we say that it sends the ready request to the server.
If you choose to use POST method, you should write properly the value to put inside the send method (to be URI-encoded). Example:

xhr.send('x=16&y=17');

To sum up, here is roughly a code snippet to perform properly your Ajax request. ourAjaxDiv is the id of the div in which we want to put our response:

var xhr;
if (window.XMLHttpRequest) {
xhr = new XMLHttpRequest();
}
else if (window.ActiveXObject) {
xhr = new ActiveXObject("Microsoft.XMLHTTP");
}
else {
throw new Error("This browser does not support XHR!”);
}

xhr.onreadystatechange = function() {
if (xhr.readyState == 4) {
if (xhr.status >= 200 && xhr.status < 300) {
//success
document.getElementById('ourAjaxDiv').innerHTML = xhr.responseText;
}
else {
//failure
}
}
}

xhr.open('GET','/server/application/url');
xhr.send(null);


All these code lines above should be compressed in only one line thanks to jQuery:


This was the equivalent code in jQuery ! How do you find it?

There is another thing more important than this equivalent code. It is merely the fact that jQuery handles for us quite a few issues that we can have when we get the response body.

For more details about this function, please check out the great documentation of jQuery official site: Link.
This was a first glimpse about the strength of jQuery about how it handles the communication with the server with a clean and easy JavaScript code.
The next articles related to this topic will talk more closely about Ajax handling by jQuery. We will see with examples how we can use some functions like $.getJSON, $.get, $.post, $.ajax and others.
Without your comments and suggestions, this should not succeed. So please don't hesitate to ask!
Read More


jQuery Revolution in Ajax Field

Posted by jcargoo | Friday, November 20, 2009
| 0Delicious Twitter Reddit Digg Loading...

A series of articles on how jQuery can make cleanly Ajax in the Rich Internet Applications. I cover the most used and useful jQuery Ajax commands with examples. For some ones of you, this can be considered as refreshment. For others, the series can really help you to have a good point of jQuery Ajax initiation.


jQuery Revolution in Ajax Field – Part 1
Talking about the XHR instance and jQuery Ajax command; load()...


jQuery Revolution in Ajax Field – Part 2
More about load(), serialize(), serializeArray() and an introduction to JSON ($.getJSON())...


Read More


The Friday Post: Selection of 11 Free Fonts for Designers and Developers

| 0Delicious Twitter Reddit Digg Loading...

In this selection I am glad to present you 5 AM Gender, Calluna Regular, Diavlo, Evolution True Type, Grayscale Basic, Mank Sans, Neuropol X Exp Light Italic, Special K, Steiner, Times New dirty Roman and Vegur. The full selection of fonts is free to use. You can have a look at their associated license agreements.

5 AM Gender


Calluna Regular


Diavlo


Times New dirty Roman


Evolution True Type Font

Grayscale Basic


Mank Sans


Neuropol X Exp Light Italic

Special K


Steiner


Vegur

Enjoy! and have a nice weekend.
Read More